Author Archive for:Rebekah

Proud to be an American and to be in love with Balki

I am reminded of the cost of my freedom when I read the headlines of a young man giving his life for me, for you, for us. I have been all over the world, and I readily say that I am thankful for my country and grateful for where I live.
Touring with Biceps has afforded me the opportunity to see my country’s most valued treasures up close and personal, always grounding what I otherwise might take for granted.

I stood underneath Lady Liberty, our size comparison was that of:
me=flea, she=oak tree. From the bottom of her base to the tip of her torch, she is 305+ feet tall. That’s one huge statue. Those little white things in the bottom of the photo are sea gulls.
Given to us by the French in 1886; Lady Liberty has literally become the face of America.


She has seen many wars, diseases, presidents, terrorist attacks and pop stars.
Lady Liberty is a constant reminder to us Americans, that we are a strong and united country, craving our freedom and our Justin Bieber.


My ancestors, Biceps ancestors and many others held their breath, hoping to see her face as they approached New York and the New World.
I believe it was at this moment, Balki Bartokomous knew he had arrived, ready to find his Cousin Larry.


To every man and woman that has sacrificed their lives, their jobs, and their reputations to maintain my country’s freedom-thank you. Thank you Dad, Uncle Bill, Uncle Kelly, Keith, Jacob and countless others for joining the Armed forces and keeping me safe. And thank you, Balki, for changing the lives of my family every Friday night when you performed your dance of joy or your Bibi Babkas song.


America, Land of the Free and Home of the Brave and Balki.

Read more

The Concrete Pour of 2010…well, one of the many.

I described my lovely Memorial Day a few days ago. You may know that I have spent most of my week basking in the sun–lakeside while being served dainty drinks and fed luscious morsels.

And when I say ‘lakeside’, I mean in my neighbor’s front yard.
And the ‘dainty drinks’ were more of hurried gulps out of the cooler that leaks water all down your front.
And the ‘luscious morsels’ were protein bars. But they were s’more’s flavored, so I guess that’s pretty close….
At any rate, we were ready to pour the sucker you see above.
And this was pretty close to a day at the lake.
(See how we got to this point over Memorial Day.)


The concrete truck arrived at 8am sharp, ready to unleash its mix.


Biceps was in charge of the wheel barrow and I was in charge of raking the concrete once it had been poured into the form.
Three words: Impromptu Shoulder Workout.


This my dears, was just the beginning.
Lots of raking, sloshing of concrete onto my skin, falling into the dirt hole around the forms, etc., was happening for an undocumented couple of hours. It was better left undocumented.


The pour is now complete-now on to the finishing!
After banging the sides of the forms with a hammer to remove the air bubbles, we lightly troweled the top to bring up the cream (the smooth watery part of concrete). Then we had a soda and let the steps set up while whining about our sore muscles. Superb marital bonding time.


This little edging tool was the next step. We went around the perimeter of the forms with the edger, bringing a nice sharp line to our steps.


More troweling, then edging, then troweling, then edging….You get the idea.
(That’s Bicep’s hairy forearm, not mine, mind you.)


After we were satisfied with our edging and troweling, the moment of truth came as we removed the forms.
Drumroll, please.
Will the steps mush out everywhere and become a soupy mess?
Or are they going to be rock hard and unable to be finished?
Are you as nervous as I was at this moment?
Doubt it.


No soupy mess! And not rock hard! Just perfect.
We filled all of the holes with our excess concrete, troweling everything until it was smooth like glass…and somewhere during this process, both of my arms fell off.
I had to do the rest of the work using a trowel held in my teeth.


Finally, we ‘broom-finished’ the steps and the platform to prevent people from slipping on the concrete when it rained. Aren’t we considerate?


And TAH-DAH! Aren’t these steps exciting?
Can’t you just picture yourself running up and down them, time after time?
Yelling at people from the top step while they are on the bottom step?
Or sitting on the steps enjoying another soda during a dream sequence?
Yep, me too.

Read more

Va-Va-Voom Vintage Tablecloth Dress

Grandma Greiman sent me away from her farm with a trailer full of treasures.
This old tablecloth was barely holding on to its original embroidered flowers and I couldn’t bear to throw it out or tear it up into scraps.
So, why not throw in a scarf for good measure and make a dress?

Scarves have become one of my favorite fabric pieces to re-invent.
They are the perfect material for molding into free-flowing sassy pieces. And boy am I into the sass. You have no idea.


I created my own pattern for this dress by trial and error. (My pattern was made for me, and I am a size two. If you would like to increase the size, a general rule is to add 1/4” all the way around per size increase.)

To Make this Dress, you’ll need:
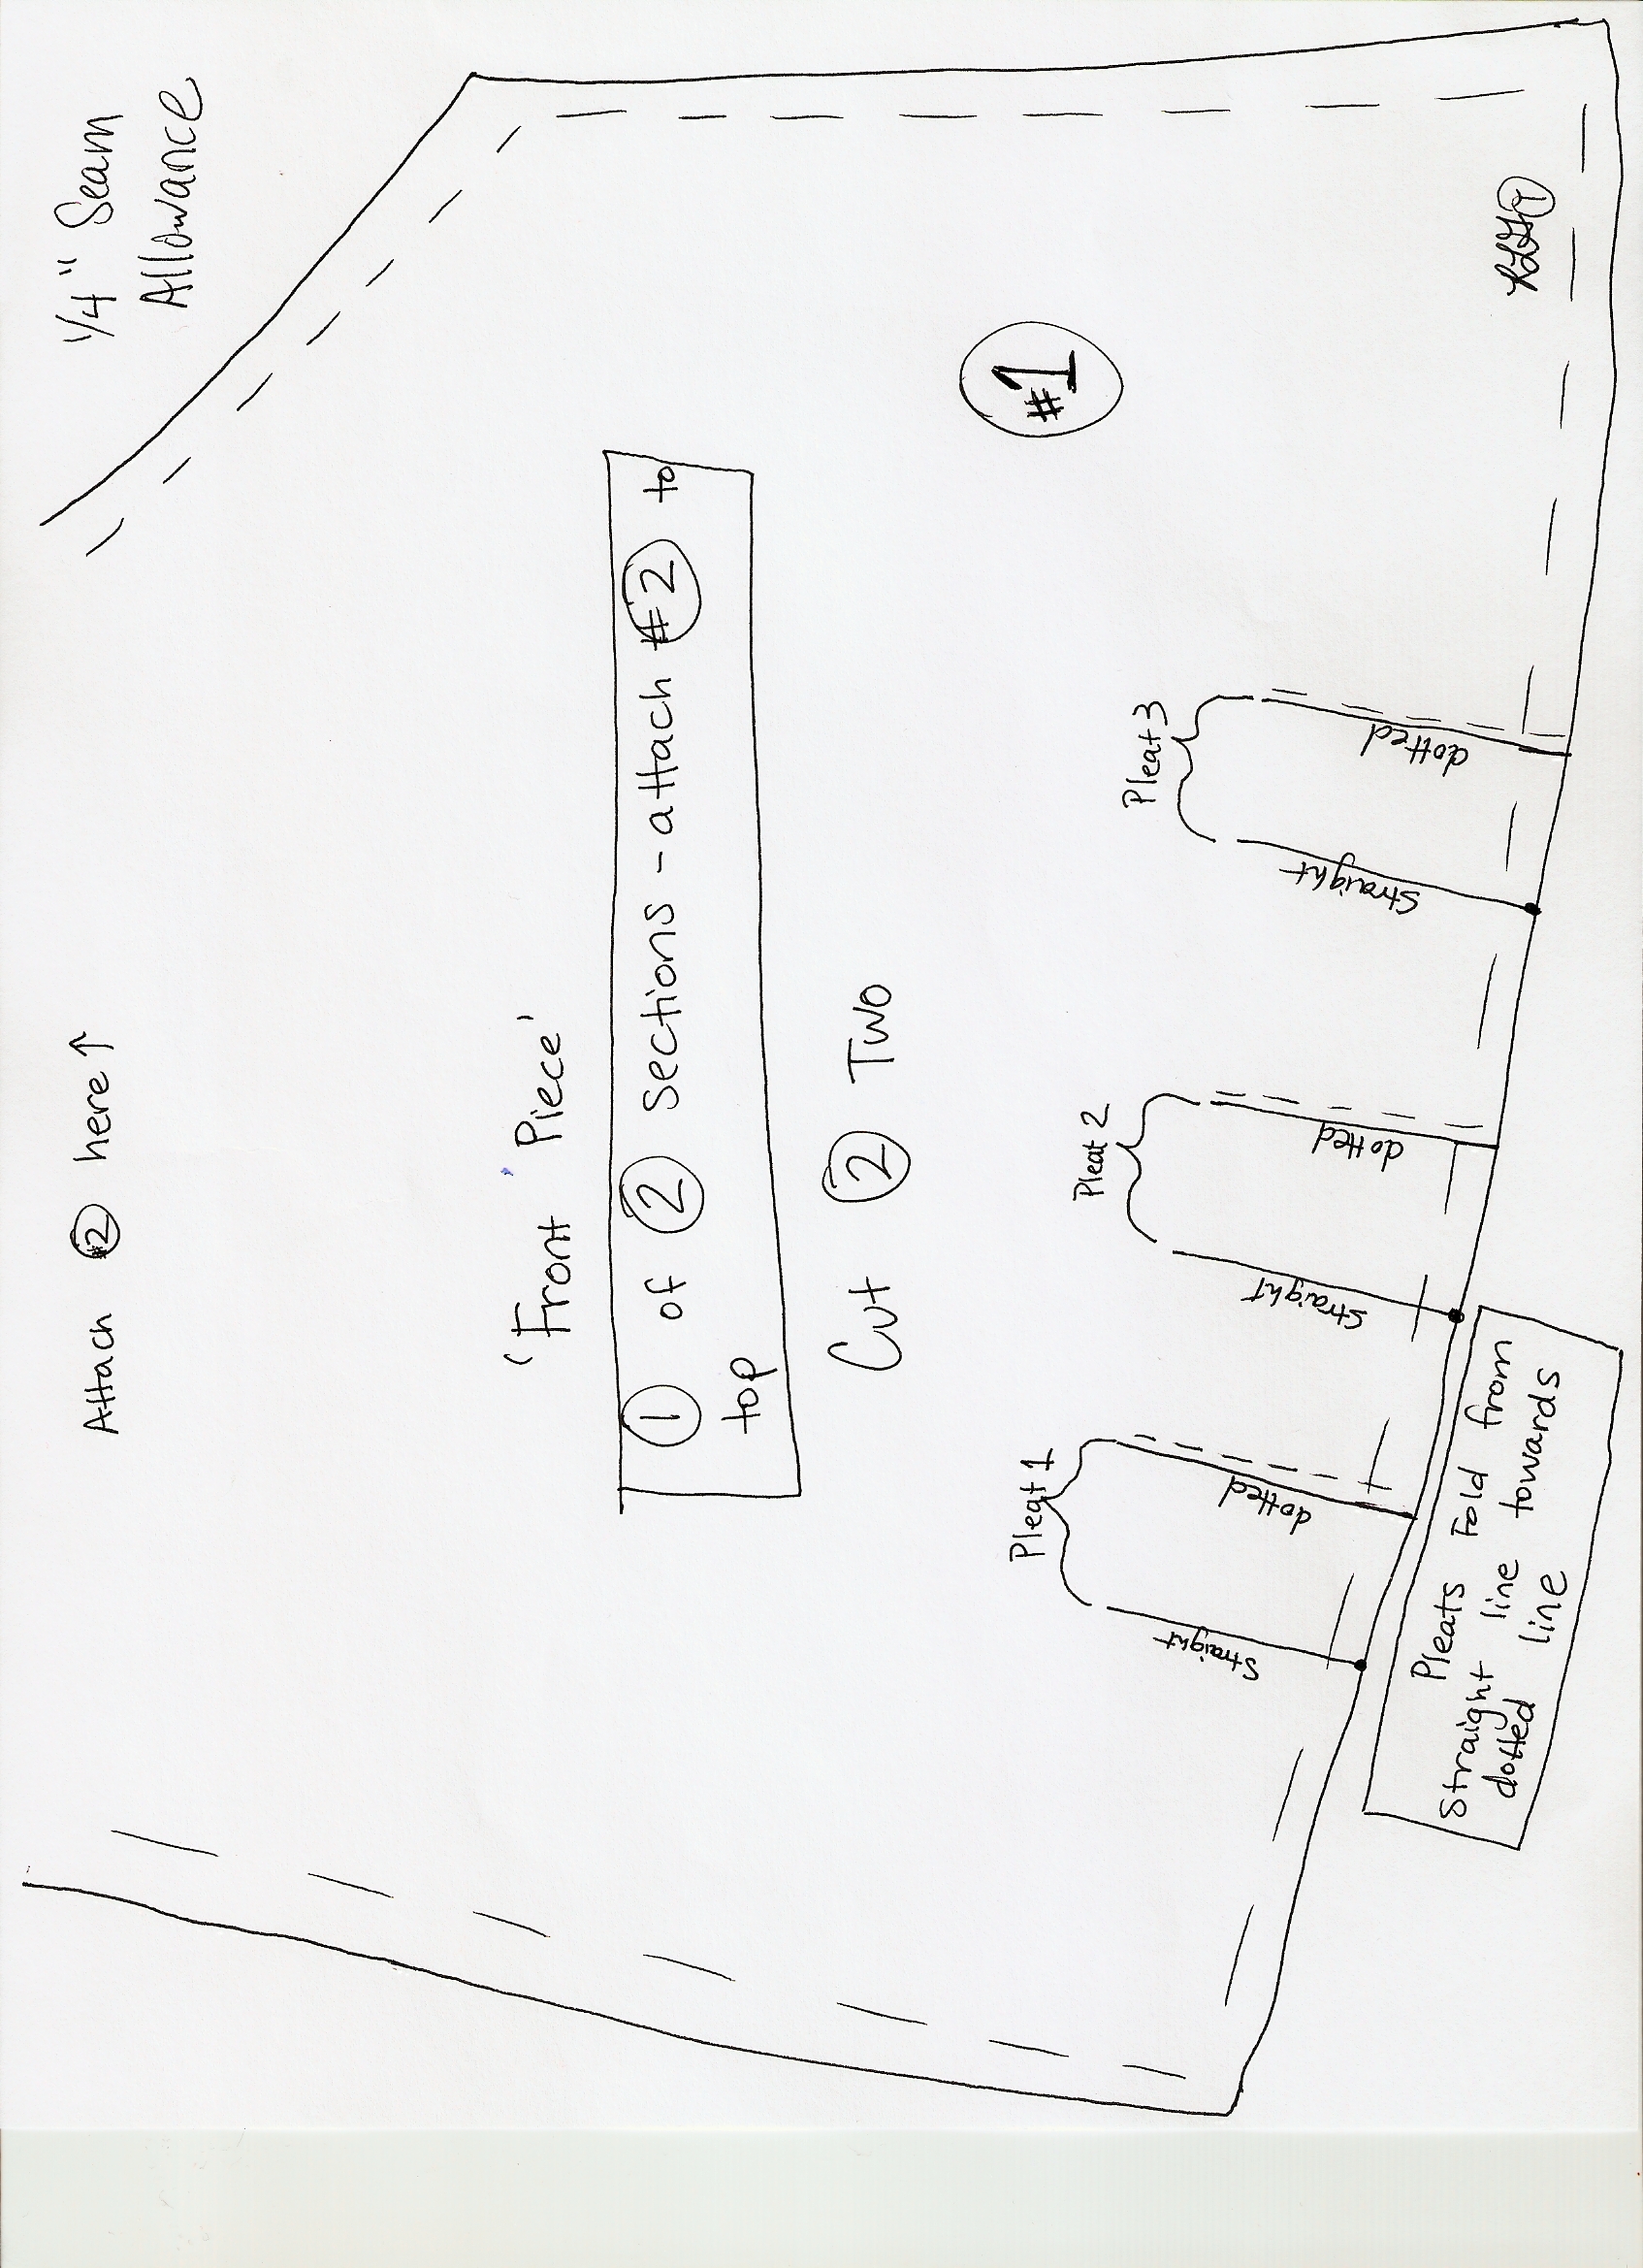
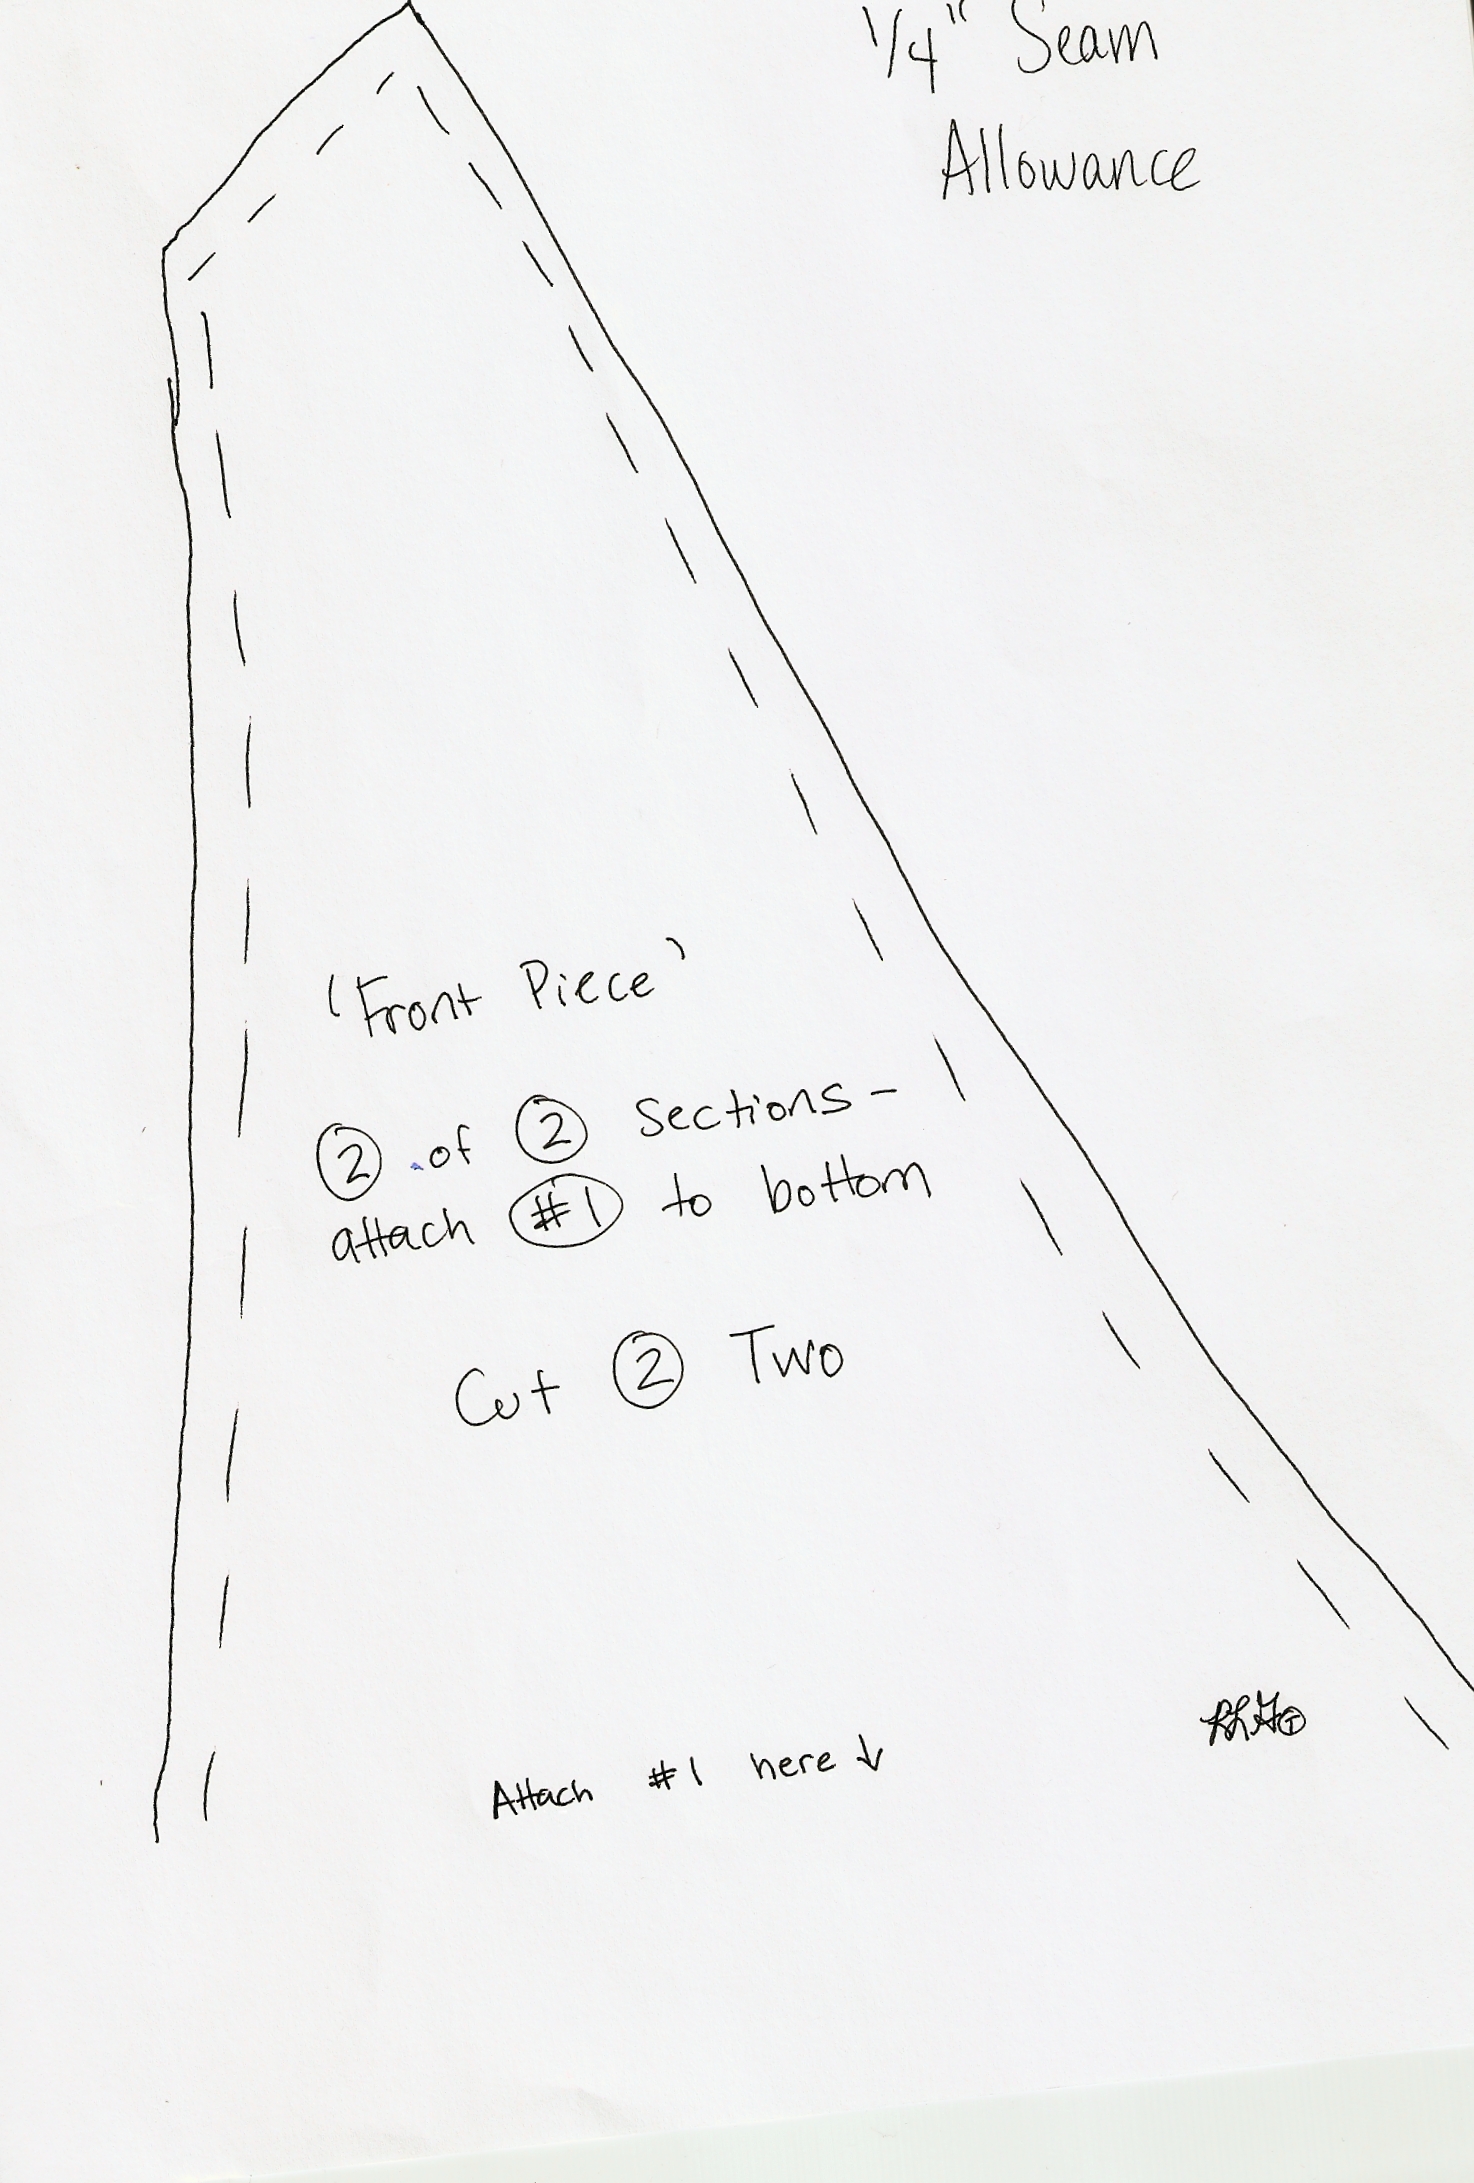
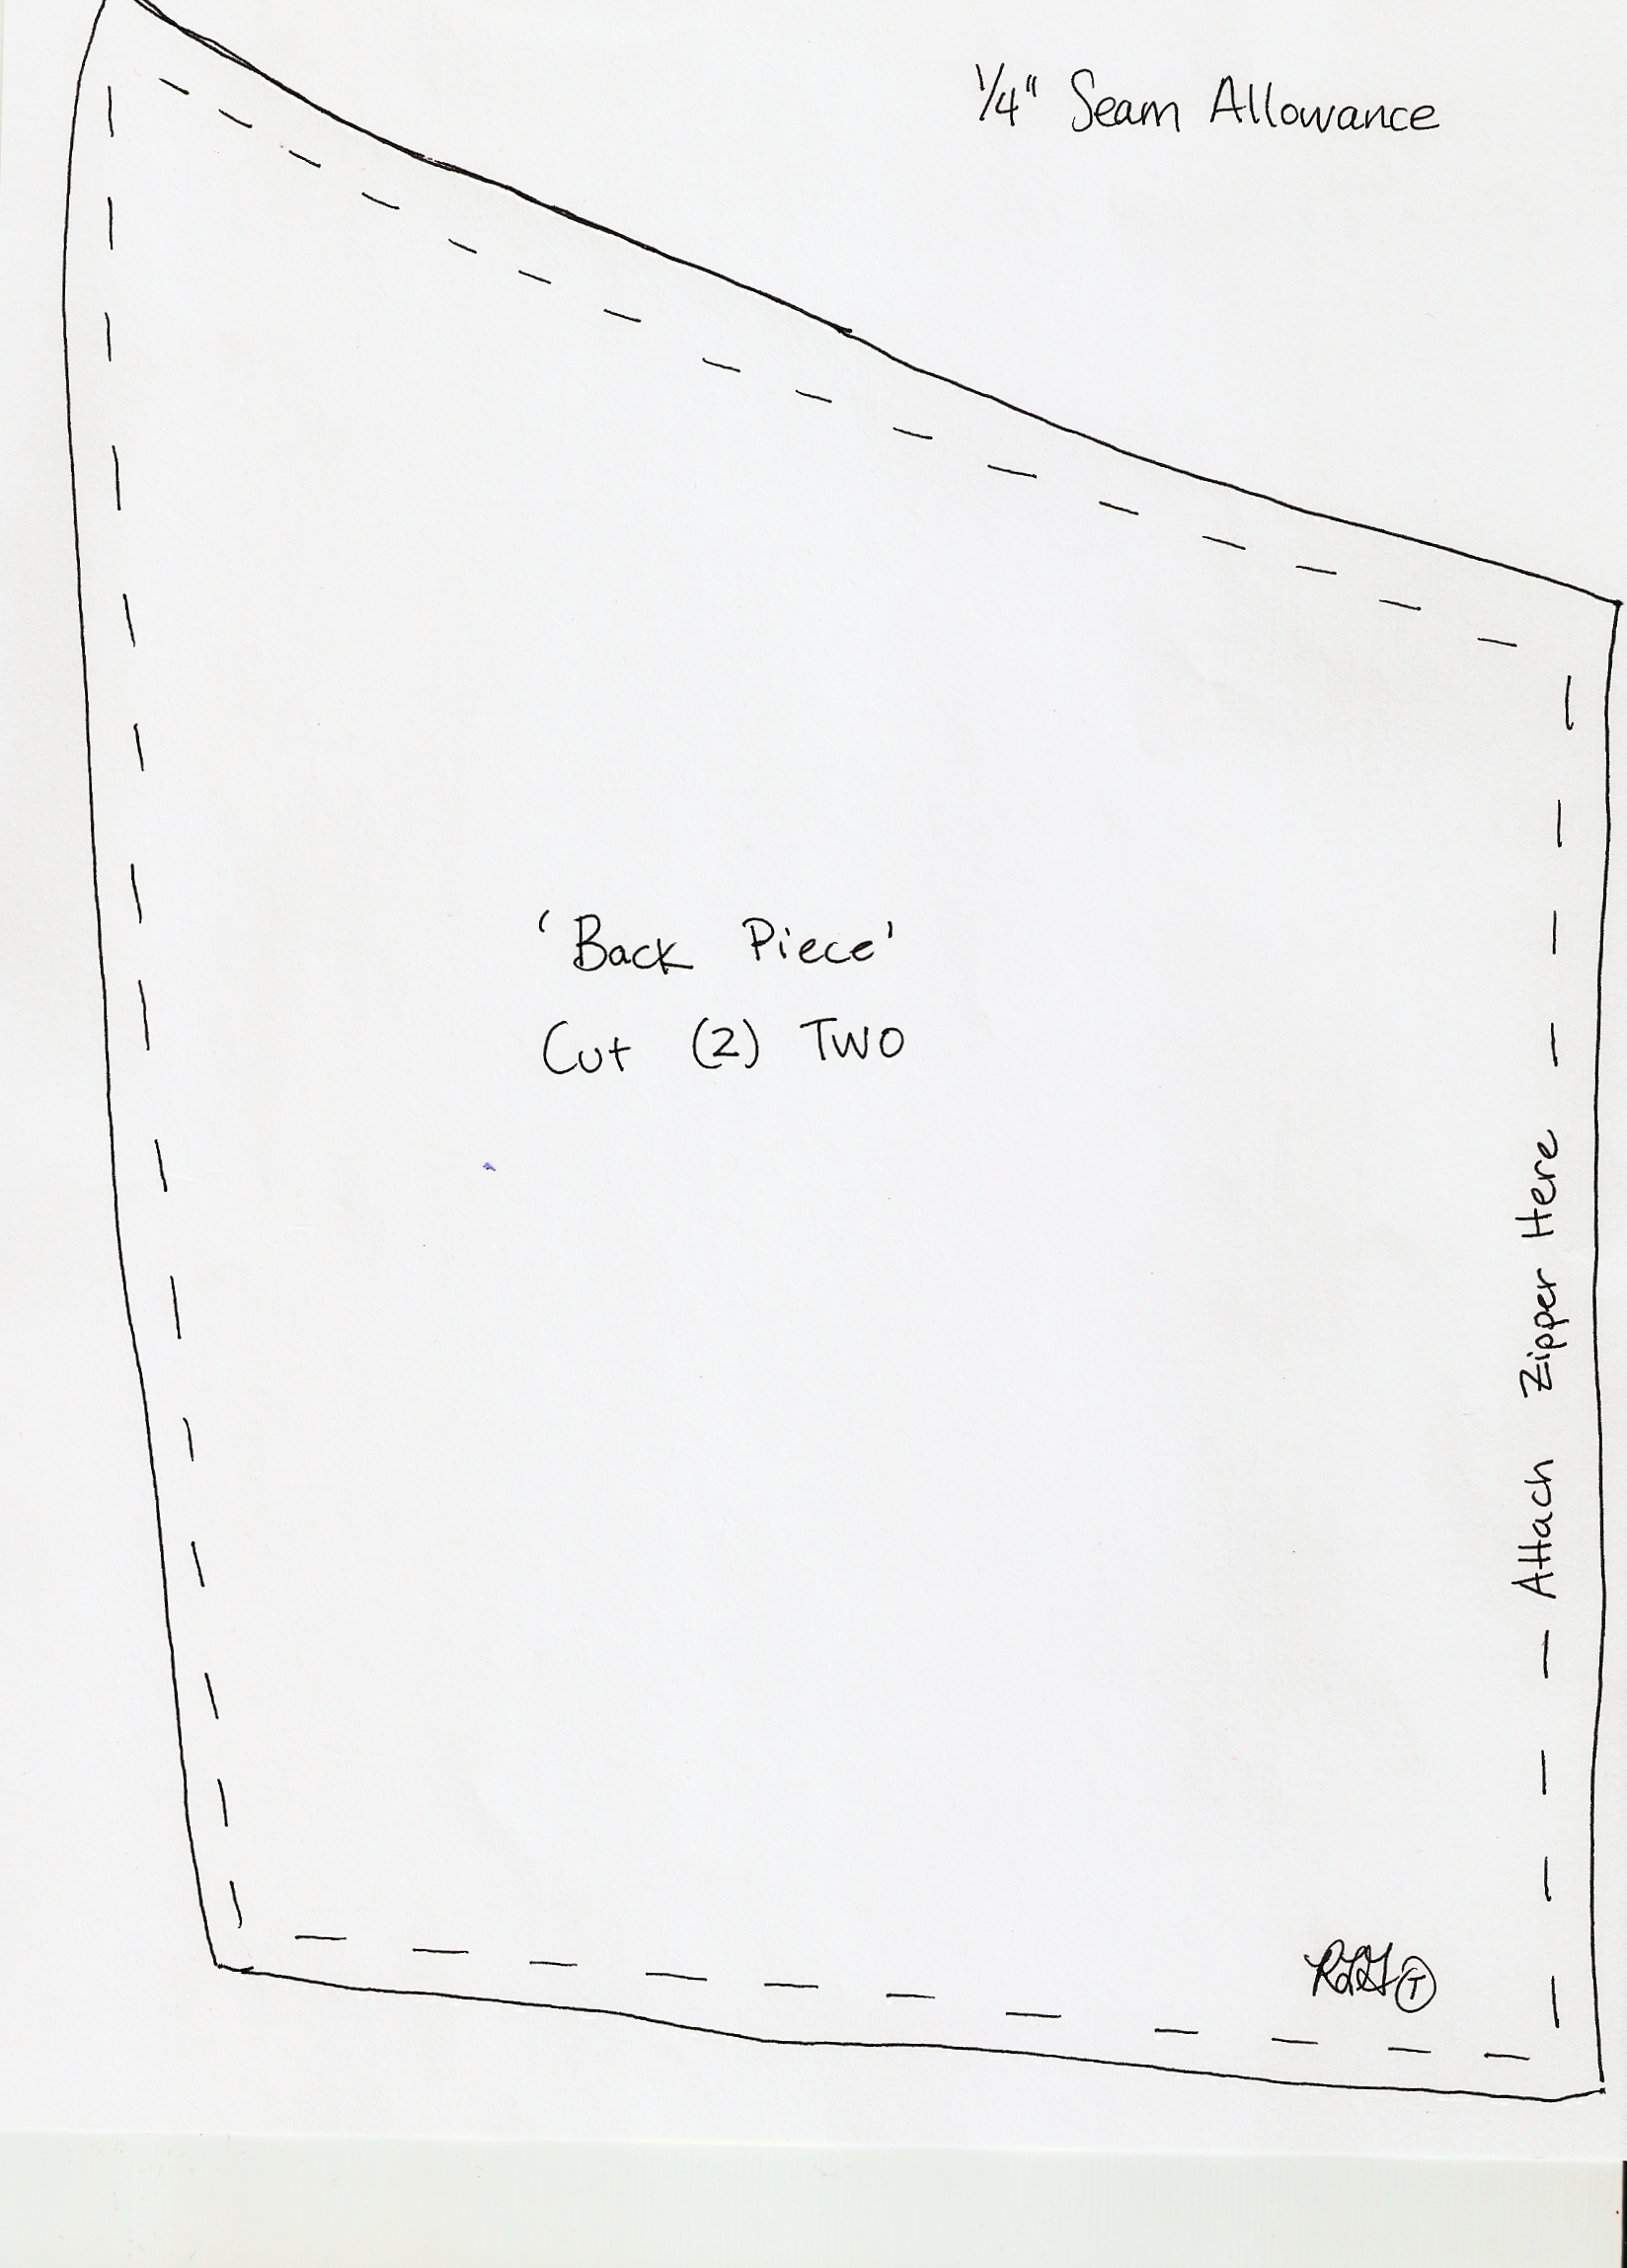
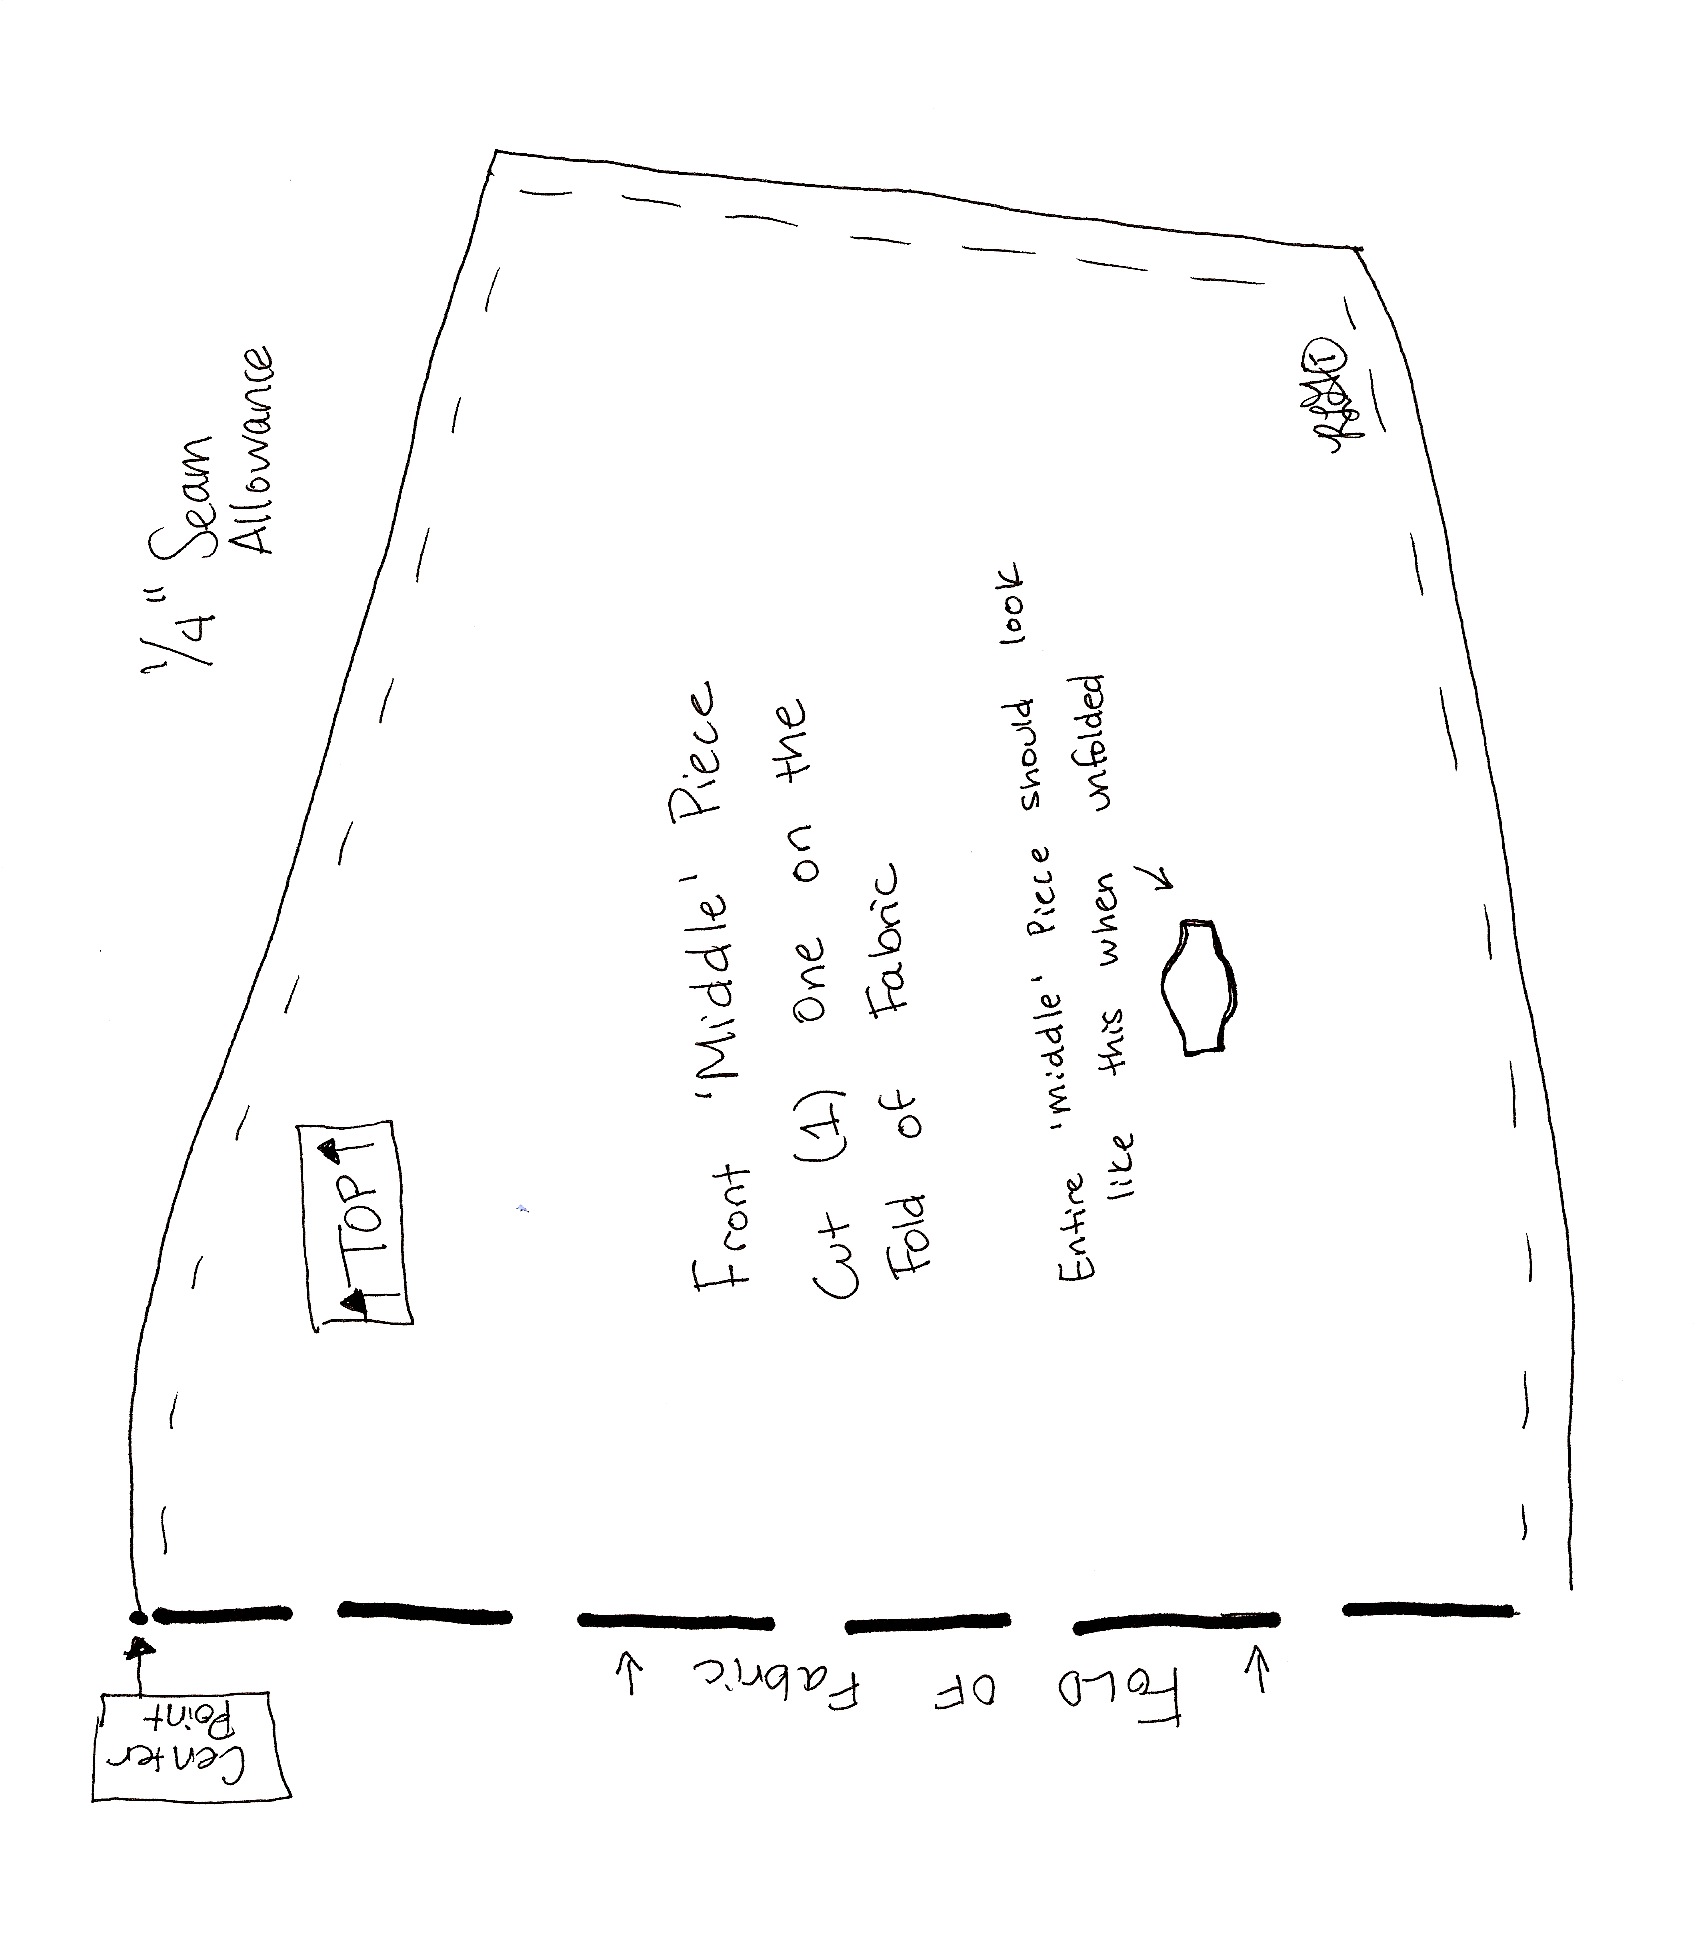
Four Pattern Pieces (Front Piece #1, Front Piece #2, Back Piece, Middle Piece)
One Large Silk Scarf
Cotton backing fabric the same size as the scarf
Round Tablecloth (mine was 66” in diameter)
20” Zipper
Straight Pins
Scissors
Seam Ripper (If your expertise is anything like mine)
Thread to Match
Sewing Machine

Fold your scarf in half and lay your pattern on top of it. Cut out two ‘back pieces’, two ‘front pieces’ and one middle piece.

Repeat this procedure with the cotton backing fabric.


With the right side of your fabric down, pin the pleats in your two front pieces and iron them flat.
Then pin the two front pieces to your middle piece and sew.
Make sure you sew the neck pieces together as well.


Pin & sew your two ‘back’ pieces to what you had just sewn together.


We are going to repeat this process with your scarf. But since I am a visual learner, I will go ahead and do it all over again for you. With the right side of your scarf fabric down, pin your pleats in the ‘front’ pieces first and iron them flat.
Now, pin your two ‘front’ pieces to your ‘middle’ piece and sew.
Make sure you sew the neck pieces together as well.


Pin & sew your two ‘back’ pieces to what you had just sewn together.
This seems all too familiar….


With right sides of your material together, pin your scarf to your cotton backing material. Sew all of your outside seams together, leaving the bottom open. We will now call this the ‘Top Piece’.


Fold your round tablecloth in half and place it on top of the right side of the material to your Top Piece.
Find the center of your folded tablecloth and pin it to the center of the bottom of your ‘Top Piece’.
Working from the center out, pin the folded tablecloth around the entirety of your top piece. Sew the Top and Bottom pieces together.
I added pleats to my tablecloth ‘Bottom Piece’, just in case I partake of a single scoop of peppermint ice cream in a waffle cone…but you do what you want.


Next comes the zipper. My favorite part. Notice my text is oozing with sarcasm.
I have never liked putting in zippers. I don’t know why…I just don’t.
Anywho…fold the right side of your fabric over a quarter of an inch on your Top Piece and pin your zipper on the inside of the material.
Do NOT fold over your material on your Bottom Piece. Pin the zipper directly to the material, leaving the excess to do as it pleases.
Give your Booty some room to breath by fanning the zipper away from the waist until you reach the end of the zipper on the Bottom Piece. (Mine needed an extra 2” from waist to end of zipper.)
Sew your zipper into place on both sides.


Here is the finished VA-VA-VOOM Vintage Tablecloth Dress.
Mine and the dress’ backside is below.


I can’t wait to wear this little piece out on the town! Now, to convince Biceps we need a night out on the town…..

Read more

The Garden

I’ve told you that Biceps and I have been building a Big Girl Playhouse for some close friends.
What I haven’t told you is that they have a drop dead gorgeous garden-worthy of being featured in Home and Garden magazine.

This little beauty soothed my aching spirit during the awful-four-foot-hole digging process.


Each time that I hit myself with a hammer or accidentally drill through my flesh (which is often), I sit here and regroup and think of quieter times.


I bring my mind to a peaceful place, listening to the trickle of water and the swaying of branches. I obtain inner harmony…..
That is until I hit myself with a hammer again.


And when that happens, I come back again and sit a moment longer, watching the Koi and tiny frogs doing their thing.
They have no idea a gigantic shed is being built just a few feet away. I try to tell them all about it and how many bruises I’ve encountered. I am pretty sure they sympathize with me.


As a ‘job-site’ goes, this one is pretty top notch. With each new flesh wound, I remind myself that this view is a lot better than a gray cubicle lit by fluorescent bulbs. Although sometimes I do daydream about a cubicle far, far away from saws and sledgehammers and splinters.
Until Biceps snaps me back to attention, requesting help with hoisting up the next rafter. I force myself to leave my zen in the garden, grab my tool belt and head back.
A Big Girl Playhouse doesn’t build itself, you know.

Read more