Tag Archive for: homemade

Ten (Plus) Easy Ways to save Money

I am frugal by nature-just ask my parents. I used to hide girl scout cookies under my bed, only allowing myself one delicious thin mint a night. That is-until the ants also found my stash and my parents put an end to my cookie hoarding ways.

That said, I love to save money. Here are ten (plus) easy ways that you can, too!


Chapstick
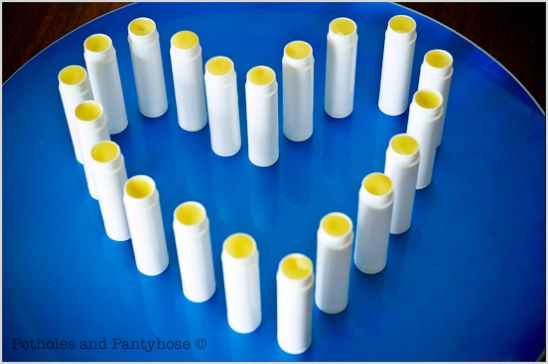
1) Biceps uses lip balm like nobody’s business. And to be fair-so do I. But, is it a crime to want supple, luscious lips void of cracks and flakiness. I contest that it is not!
However, the $3 a tube for Burt’s Bees was a crime. And I needed to solve it. With a few ingredients and within a few minutes time, I had made 40 tubes of Lip Balm that cost less than $.25 each.


Cleanser
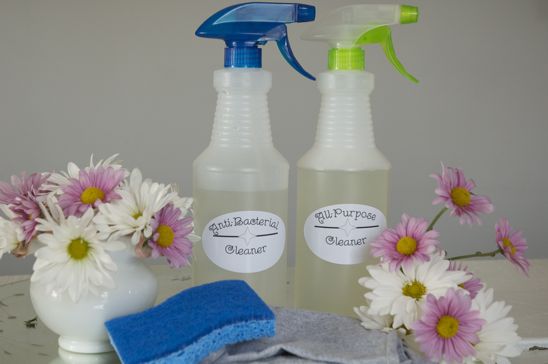
2) I make all of the cleansers that I need to keep my home sparkling. They are cheap, easy to make and non-toxic. Everything from: all purpose & anti-bacterial cleaners, to furniture polish, toilet bowel cleaner, brass and stainless steel polisher, and cooking spray.


Potholes and Pantyhose
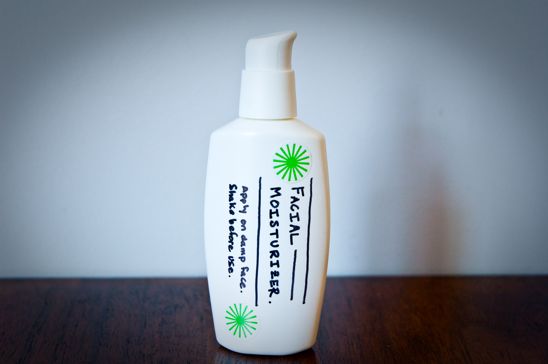
3) I also make most of my beauty products saving me hundreds of dollars a year. Check out this easy to make facial moisturizer, eye make-up remover, toothpaste and mouthwash.


Face Wash
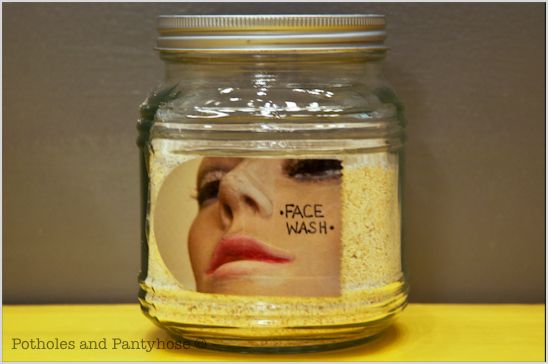
4) Simply make your own face wash using ground oatmeal. I know what you might be thinking-how does oatmeal on my face actually work? The ground oats add moisture back into the skin (thus the reason you are supposed to bathe in it when you have a rash, poison ivy, etc) while the gentle oats exfoliate the skin and cleanse. Cheap. Simple. Love it and the smell of breakfast as you’re washing my face.


Laundry Soap
5) I make my own laundry soap once a month which lasts me for 48 stinky, big-boy loads. I save big-boy money doing this. The clothes smell great and it’s fun to grind up soap in my blender. Everybody wins.

I also make my own laundry softener and stain stick. Super easy, does the job and smells fantastic!


Mirror Art
6) Make your own art with whatever you have on hand. Get creative and dare to cut your knuckles making this Mirror Art. I’ve used scrap plywood, drywall, oops paint, repainted canvases, and many other odd things to decorate my walls. And-the best part is-if you screw up, you can just throw it away!


Potholes and Pantyhose
7) Learn how to do some basic sewing and start getting thrifty. I made this silky scarf shirt with a couple of scarves and two pieces of ribbon. The cost-$1. I’ve also made shirts and dresses from pillow cases, and cape shirts from lace tablecloths.


Thank You
8) Create your own cheap thank you notes by recycling old photos, postcards, pictures from magazines. Sew them onto card stock and offer your friends a one-of-a-kind letter in the mail.


Veggie Wash
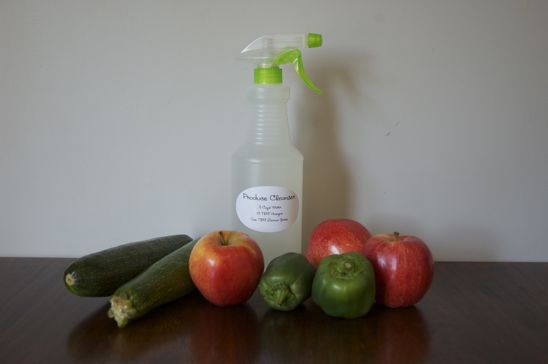
9) The produce cleanser I was buying from the store cost about $3 a bottle. Forget that! I now make my very own produce cleanser at home for about $.10 a bottle. Those are savings you can keep!


Garden-Tomatoes
10) Keep your garden humming all year long with an inexpensive DIY spinning composter, rain barrels, critter deterrent and pest spray.

These are just a few ways that I’ve found to save money and replace store-bought items. What are some of your favorite ways to be frugal and keep your cold-hard cash where it belongs (in your wallet)?

Read more

Tasty, Homemade Peppermint Toothpaste

I am obsessive compulsive about my teeth. I will brush after coffee while I’m still at Starbucks. I will finish a meal out with a quick trip to the bathroom just to get my brush on. I blame my OCD behavior on good old fashioned self-imposed guilt knowing just how much my parents scrimped and saved so that I could have braces. I also blame my German teacher in high school, whose breath-God bless her heart-smelled constantly of coffee and lifesaver candies.

Therefore, I am determined to never offend someone with my breath or destroy the investment Mom and Dad spent a fortune on.


In the past, I’ve been alright spending $4 on a tube of toothpaste. Not anymore-those frivolous days have ended. I’ve finally found the love (of toothpaste) of a lifetime. It’s freakin’ cheap, it tastes great, and it keeps my pearly whites pearly.

It’s everything I hoped a toothpaste would be.


Here’s all that you’ll need to make your very own Peppermint Toothpaste:
4 TBS+ Baking Soda (depending on how thick you like your toothpaste)
2 TBS Vegetable Glycerin
1 1/2 tsp Stevia Extract
1/2 tsp Hydrogen Peroxide (3.5% or less)
1/4 tsp Peppermint Oil
5 drops Tea Tree Oil
Opaque/Dark Container


In a mixing bowl, measure out 4 TBS of Baking Soda. Baking Soda whitens your teeth and lightly scrubs away the gunk.


Add to this the 2 TBS of Vegetable Glycerin. The Glycerin creates a smooth, non-gritty toothpaste. You can leave this out if you desire, but the toothpaste will be a bit more cakey.


To this, add the 1 1/2 tsp Stevia Extract. The Stevia adds a little sweetness to the toothpaste. You can add more or less dependent upon your sweet tooth needs (ironic…).


Add the 1/2 tsp Hydrogen Peroxide. Hydrogen Peroxide will whiten teeth, clean gums, and disinfect the mouth.


Next, add the 1/4 tsp Peppermint Oil-which gives the toothpaste a kick and lovely flavor. You can replace this oil with cinnamon or something you prefer more.


Lastly, add 5 drops of Tea Tree Oil. The Tea Tree Oil is an anti-fungal, anti-bacterial and anti-all nasty things that can be found in your mouth. (Yick).


Mix everything together using a spatula. Add more Baking Soda if the consistency isn’t thick enough.


Test a little out, adding more peppermint if you like super spicy, more Stevia if you want it sweeter.


Store the toothpaste in a dark or opaque container. I re-used a burn cream container for my paste.


Enjoy your very own homemade toothpaste while knowing you rule. With very little time or money spent, you now have a pearly whites polisher without all the chemicals and pocketbook guilt!


Tasty, Homemade Peppermint Toothpaste
Author: 
Recipe type: Homemade Beauty Products
Prep time: 
Total time: 
 
In the past, I've been alright spending $4 on a tube of toothpaste. Not anymore-those frivolous days have ended. I've finally found the love (of toothpaste) of a lifetime. It's freakin' cheap, it tastes great, and it keeps my pearly whites pearly.
Ingredients
  • 4 TBS+ Baking Soda (depending on how thick you like your toothpaste)
  • 2 TBS Vegetable Glycerin
  • 1½ tsp Stevia Extract
  • ½ tsp Hydrogen Peroxide (3.5% or less)
  • ¼ tsp Peppermint Oil
  • 5 drops Tea Tree Oil
  • Opaque/Dark Container
Instructions
  1. In a mixing bowl, combine and measure the 4 TBS of Baking Soda, 2 TBS Vegetable Glycerin, 1½ tsp Stevia Extract, ½ tsp Hydrogen Peroxide, ¼ tsp Peppermint Oil and 5 drops Tea Tree Oil.
  2. Store in an airtight, opaque or dark container.

•   •   •   •   •   •   •   •   •   •   •   •   •   •

I hope you have enjoyed these recipes! It may seem overwhelming at first to rid your home of toxins and store-bought everything. And maybe you don’t want to make these products, but would like the benefits of non-toxic products in your home without going broke. I have found some simple solutions to replace the things that I cannot make/don’t want to make myself by purchasing them from a non-toxic green company online. Without directly endorsing them, if you are interested in knowing more,  Feel free to email me with questions.

Here are links to my other Homemade Household Cleansers and Beauty Products:

Homemade Beauty Products
Simple, Organic Lip Balm
Homemade Peppermint Mouthwash

Easy Laundry Soap
Homemade Laundry Softener
DIY Stain Stick


DIY Brass Cleaner
Organic Vegetable/Produce Cleaner
Homemade Household Cleaners

And here are a few Homemade Food Items to easily replace store-bought items:

Simple, Tasty Granola
Easy Crockpot Yogurt
Simple, Homemade Butter
Cooking and Freezing Beans, avoiding BPA
Homemade Hummus
Garden Fresh Salsa

If these parties are up, I link to them! (Here’s my complete Linky Party Page):
Monday: Crafts Keep Me Sane, The Better Baker, Skip to My Lou, DIY Showoff, Say Not, Sumo’s Sweet Stuff, Etcetorize, Sew Chatty, Brassy Apple, Flour Me With Love, Creating my Way, Mad in Crafts, Our Delightful Home, Sew Can Do, It’s So Very Cheri, Craft O Maniac, Polly Want a Crafter, Tuesday: Craft Edition, Inspiration Board , New Nostalgia , Lettered Life , Coastal Charm, Tip Junkie , Ladybug Blessings, Hope Studios , Todays Creative Blog, Wednesday: Someday Crafts , Day2DayJoys, Jillify It , Junk in the Trunk, We are that Family , Frugally Sustainable, Sew Much Ado, Fine Craft Guild , The Thrifty Home, My Girlish Whims , Quick, Easy, Cheap & Healthy, Trendy Treehouse, Thursday: Somewhat Simple, No Minimalist Here , A Glimpse Inside, The Mommy Club, The 36th Avenue, Cheap Chic Home, Beyond the Picket Fence, Fireflies and Jellybeans , House of Hepworths , The Shabby Chic Cottage, Friday: My Repurposed LifeIt’s a HodgePodge LifeThe Shabby NestJust Wingin’ ItOne Artsy MommaFrench Country CottageFinding Fabulous, Passionately Artistic, Petals and Picots, Simply Designing, Little Becky Homecky, My Romantic HomeBacon Time, Simply Living, Saturday: Polkadot Pretties, Tatertots and Jello, Create and Inspire, Be Different, Act Normal, Craft Envy, Funky Junk Interiors, Petites Passion, Sunday: Under the Table, Natural Mothers, Mopping the Floor

Read more

Easy, Homemade Peppermint Mouthwash

Did you know that the first ingredient in most mouthwashes is alcohol (ethanol), and coming in a close second is heaping dose of sugar (sucralose, sorbital, saccharine). Awesome. Just what I want first thing in the morning.

Most mouthwashes costs around $6 for 32 oz ($.12/oz), whereas this will cost you around $1.20 for 32 oz ($.03/oz).


With just a few ingredients and in two seconds, I had my own inexpensive and tasty peppermint mouthwash. (A printable recipe card for this mouthwash can be found at the bottom of the tutorial, along with many other Homemade Household recipe links.)


Here’s all that you’ll need to make your own mouthwash:
13 oz Hydrogen Peroxide (3.5% or less)
1/4 tsp Essential Oil (Peppermint, Cinnamon, Etc)
1/8-1/4 Liquid Stevia (only if you are married to a sweet tooth, otherwise you can leave this out)
Dark Glass Bottle or Dark Plastic Container with lid


Pour the 13 oz of Hydrogen Peroxide into the bottle, using a funnel if necessary.


Add to that the 1/4 tsp of Peppermint essential oil (or your choice).


Top the mouthwash off with the 1/8-1/4 tsp of Stevia. You don’t necessarily have to add this-I was fine without sweetening it. However, I am married to Biceps who eats brown sugar out of the bag with a spoon…so, there’s that.


Shake everything together, slap a label on the bottle and call it a day.


Pour a small amount into your mouth before of after brushing. Swish the liquid around for a few minutes in your mouth and then spit out. Rinse if desired. (Keep the liquid out of direct sunlight-like the photo above.)

This mouthwash leaves the mouth feeling refreshed, clean and tingly! I guarantee you will love it.

5.0 from 1 reviews
Easy, Homemade Peppermint Mouthwash
Author: 
Recipe type: Homemade Beauty Product, Hygiene Product
Prep time: 
Cook time: 
Total time: 
Serves: 13 oz
 
Did you know that the first ingredient in most mouthwashes is alcohol (ethanol), and coming in a close second is heaping dose of sugar (sucralose, sorbital, saccharine). Awesome. Just what I want first thing in the morning. Most mouthwashes costs around $6 for 32 oz ($.12/oz), whereas this will cost you around $1.20 for 32 oz ($.03/oz). With just a few ingredients and a few seconds, create your own Peppermint Mouthwash.
Ingredients
  • 13 oz Hydrogen Peroxide (3.5% or less)
  • ¼ tsp Essential Oil (Peppermint, Cinnamon, Etc)
  • ⅛-1/4 tsp Stevia (more or less to taste)
  • Dark Glass Bottle or Dark Plastic Container with Lid
Instructions
  1. Using a funnel, pour the Hydrogen Peroxide into container. Add your choice of essential oil. Next, add the Stevia (or you can skip this ingredient if you don't want/need it to be sweet).
  2. Shake all ingredients up in the container until mixed.
  3. Use by pouring a small amount into your mouth, swishing the liquid around for a few minutes and then spitting it out.

•   •   •   •   •   •   •   •   •   •   •   •   •   •

I hope you have enjoyed these recipes! It may seem overwhelming at first to rid your home of toxins and store-bought everything. And maybe you don’t want to make these products, but would like the benefits of non-toxic products in your home without going broke. I have found some simple solutions to replace the things that I cannot make/don’t want to make myself by purchasing them from a non-toxic green company online. Without directly endorsing them, if you are interested in knowing more,  Feel free to email me with questions.

Here are links to my other Homemade Household Cleansers and Beauty Products:

Easy Laundry Soap
Homemade Laundry Softener
DIY Stain Stick
Homemade Beauty Products

DIY Brass Cleaner
Organic Vegetable/Produce Cleaner
Homemade Household Cleaners

And here are a few Homemade Food Items to easily replace store-bought items:
Simple, Tasty Granola
Easy Crockpot Yogurt
Simple, Homemade Butter
Cooking and Freezing Beans, avoiding BPA
Homemade Hummus
Garden Fresh Salsa

If these parties are up, I link to them! (Here’s my complete Linky Party Page):
Monday: Crafts Keep Me Sane, The Better Baker, Skip to My Lou, DIY Showoff, Say Not, Sumo’s Sweet Stuff, Etcetorize, Sew Chatty, Brassy Apple, Flour Me With Love, Creating my Way, Mad in Crafts, Our Delightful Home, Sew Can Do, It’s So Very Cheri, Craft O Maniac, Polly Want a Crafter, Tuesday: Craft Edition, Inspiration Board , New Nostalgia , Lettered Life , Coastal Charm, Tip Junkie , Ladybug Blessings, Hope Studios , Todays Creative Blog, Wednesday: Someday Crafts , Day2DayJoys, Jillify It , Junk in the Trunk, We are that Family , Frugally Sustainable, Sew Much Ado, Fine Craft Guild , The Thrifty Home, My Girlish Whims , Quick, Easy, Cheap & Healthy, Trendy Treehouse, Thursday: Somewhat Simple, No Minimalist Here , A Glimpse Inside, The Mommy Club, The 36th Avenue, Cheap Chic Home, Beyond the Picket Fence, Fireflies and Jellybeans , House of Hepworths , The Shabby Chic Cottage, Friday: My Repurposed LifeIt’s a HodgePodge LifeThe Shabby NestJust Wingin’ ItOne Artsy MommaFrench Country CottageFinding Fabulous, Passionately Artistic, Petals and Picots, Simply Designing, Little Becky Homecky, My Romantic HomeBacon Time, Simply Living, Saturday: Polkadot Pretties, Tatertots and Jello, Create and Inspire, Be Different, Act Normal, Craft Envy, Funky Junk Interiors, Petites Passion, Sunday: Under the Table, Natural Mothers, Mopping the Floor

Read more

Simple Homemade Butter

In March, I gave myself a month long challenge of ridding my house of nasty chemicals and high priced products that I can make myself. Here are a few of the things that I was able to replace around the house that you’d find at your supermarket in the beauty and cleaning aisles:
Recipe for Facial Moisturizer
Cheap, Organic Face Wash
DIY Household Green Cleaners
DIY Organic Eye Makeup Remover
Simple, Organic Lip Balm


Then, I got crazy in May and June replacing anything in the kitchen that comes in a package. Here are a few things that I’ve replaced that you’d find at your supermarket in the food aisles:
Simple, Healthy Salad Dressing
How to Freeze Beans and Avoid BPA
Homemade Crockpot Yogurt
Simple, Tasty Granola
Skinny Orange Julius
Sweet Iced Coffee-No Calorie


Today, I wanted to share with you a simple recipe to replace the store bought margarine or butter you have in the fridge. Here’s all that you’ll need to make your very own Simple, Homemade Butter:

2 Cups Heavy Cream
1/4 Cup Sour Cream
1/2 Cup Plain Yogurt (see recipe above)


First, prepare a water bath by filling a large bowl with water and ice cubes. Pour 2 Cups of Heavy Cream into the bowl of a standing mixer. Turn the mixer speed to medium.


Gradually add the sour cream and the plain yogurt.


After a few minutes, the mixture will begin to look frothy.


After 5-10 more minutes, the mixture will begin to resemble butter.


During this process, I usually cover the mixer with a towel to avoid splattering my entire kitchen.


The butter will start to form a clump in the center of the bowl and will give off the byproduct of buttermilk.


Once the clump is the right consistency, remove from the bowl and place on a clean, lint-free tea towel.


Dip the butter several times into the ice bath, removing all the excess buttermilk.


Save the buttermilk that was left in your mixing bowl for other recipes. It’s great for pancakes, let me tell you!


For later use, form the butter into a block and wrap tightly in saran wrap and place it in the freezer.

I usually cut the butter in half, placing half in the freezer and half in the fridge. If you are going to use the butter immediately, don’t worry about saran wrapping it. Store the butter preferably in a glass dish and leave in the fridge for up to 2 weeks.


Slather your Simple, Homemade Butter on your favorite piece of toast and enjoy your buttery awesomeness.


Read more