Tag Archive for: DIY

DIY Nursery Mobile-Cloudy with a Chance of Rain

The baby belly is growing, the pants are shrinking, and the DIY in me has come out with full force. I wanted a colorful and whimsical mobile for above the crib for Baby G. However, I didn’t want to pay the price from some fancy store that also sells $54 burp rags.


Cloud Mobile-Far Away
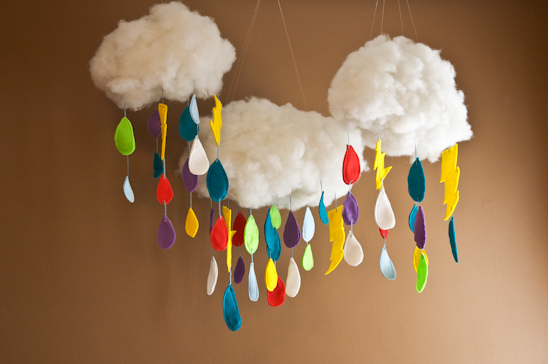
So, after gathering my trusty hot glue gun, a roll of paper towels, fishing string and colorful felt…I got to work. I spent about $4 to make this mobile. Granted, I had a few of these things on hand. If you have to start from scratch-I estimate about $10-15 to complete this project. Not bad for a pregnant woman. Not bad at all.


Cloud Mobile-Ingredients
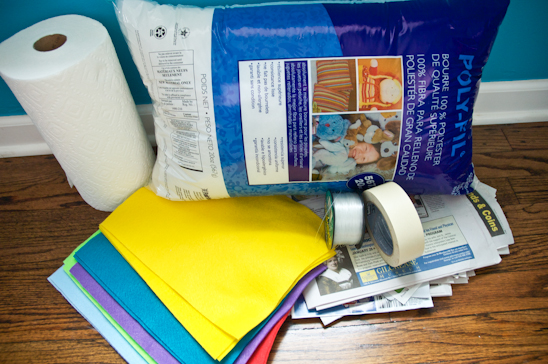
Here’s all that you’ll need to make your very own Cloudy with a Chance of Rain Mobile:
Newspaper
Masking Tape
Roll of Paper Towels
Flour
Thick Fishing Line and quilting needle (or a very tough needle)
Pillow Stuffing
Hot glue gun and glue sticks
Colorful felt and thread
Ric Rac, Ribbon, or something similar
White swag hooks (from Lowe’s or Home Depot, etc)


Cloud Mobile-Newspaper Balls
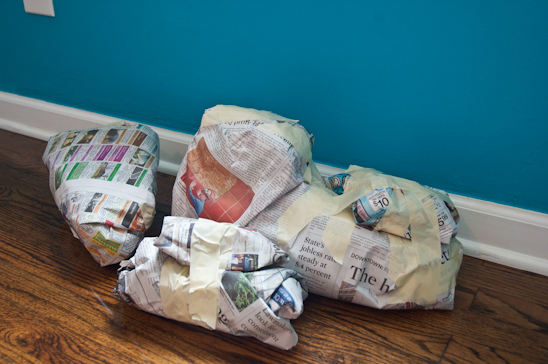
First, make “clouds” from balled up newspaper. Make them the appropriate size for the space. I chose to make a large, medium and small cloud. Use masking tape to secure the newspaper together.


Cloud Mobile-Paper Mache

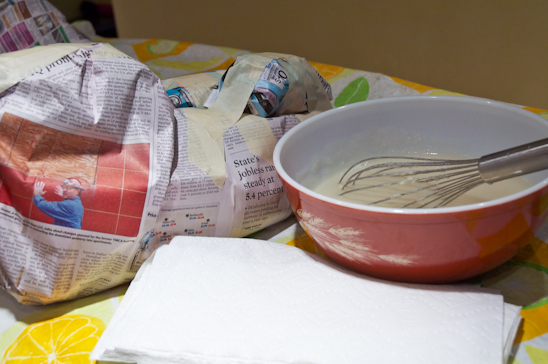
Next, use a one part flour to 5 parts water mixture. Heat the water up on the stove and slowly whisk in the flour until it’s the consistency of a thick soup. Let cool.

Dip paper towels that have been cut in half into the soupy mixture and apply to the newspaper clouds, one at a time. Cover the entire cloud with a thin layer of paper towels.


Cloud Mobile-Fishing line

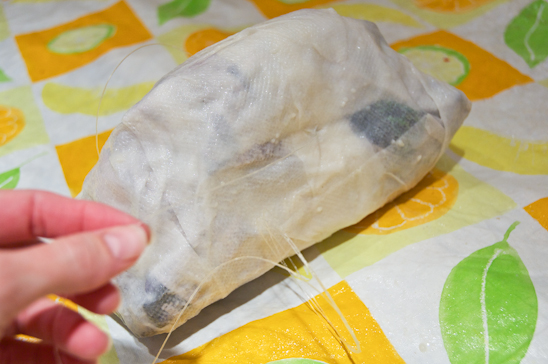
While the newspaper and paper towels are still wet, use the quilting needle to pass a long piece (about 4′ total) of fishing line through the top of your cloud, about 3-4″ down from the top. Allow an equal amount of fishing line on either side (about 2′). If the cloud is larger, I recommend having two places that you pass fishing line through. This will be what the mobile hangs from.


Cloud Mobile-Drying

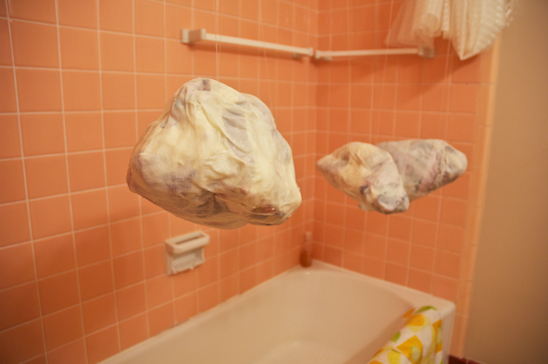
Tie the (2) 2′ pieces of fishing line together and use a coat hanger to suspend the clouds. Let dry overnight.


Cloud Mobile-Hot Glue Stuffing

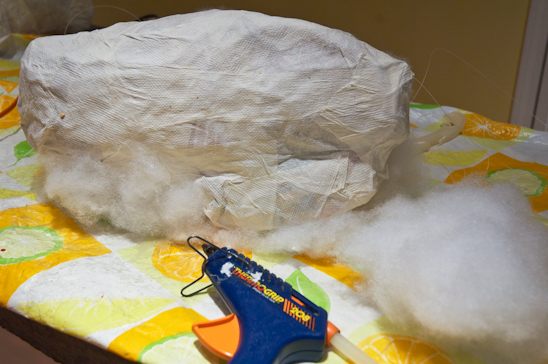
Once the cloud is dry, cover the entirety of it with the pillow stuffing by using a hot glue gun. Be careful not to burn your fingers as I did, over and over and over….


Cloud Mobile-Sewing Raindrop

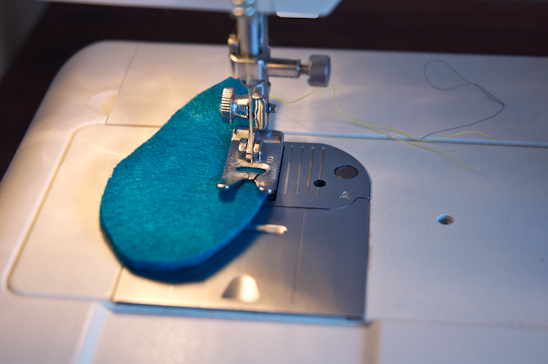
Next, cut out of the felt: raindrops, umbrellas, lightening bolts, cats and dogs or whatever else your little creative mind comes up with to hang from the bottom of the cloud. I cut out two pieces per item to give it a little more strength and dimension.


Cloud Mobile-Sewing Lightening Bolt

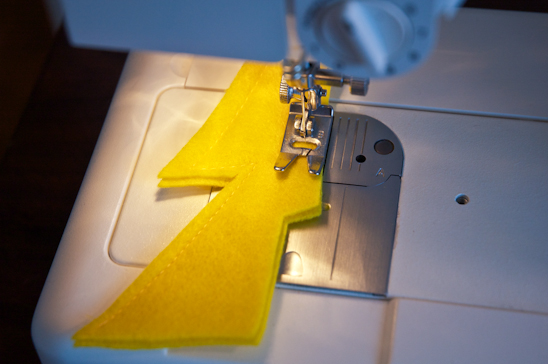
Sew the two pieces together around the outside of the object.


Cloud Mobile-Sewn Pieces
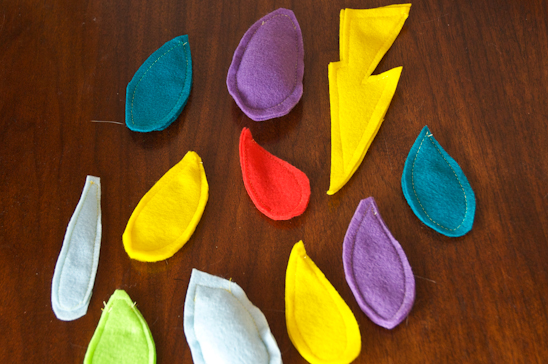
After you have sewn all the pieces, arrange them in the order you’d like to see them “drop” from the cloud.


Cloud Mobile-Ric Rac
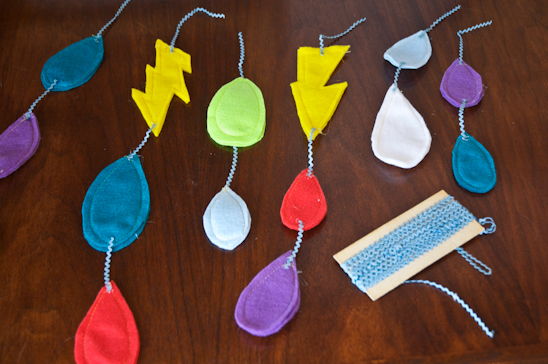
Attach the pieces to one another using a hot glue gun. I chose ric rac, but you can use ribbon or anything else that you fancy.


Cloud Mobile-Completed Bottom Side
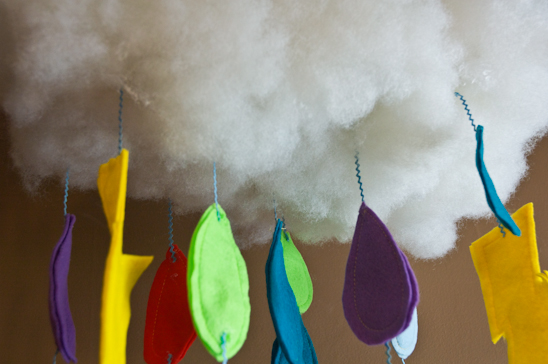
Part the stuffing at the bottom of the cloud so that you can attach the ric rac with a hot glue gun. I used a wooden skewer to push the ric rac into the bead of hot glue to avoid burning my fingers-again.


Cloud Mobile-Close Up
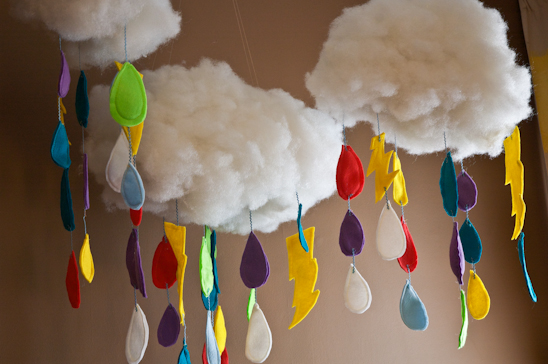
Hang each cloud from the ceiling on a swag hook, using the fishing line you sewed through the top to secure it to the hook.


Cloud Mobile-Far Away

Stand back and enjoy your handiwork. I know that Baby G. is going to love it!

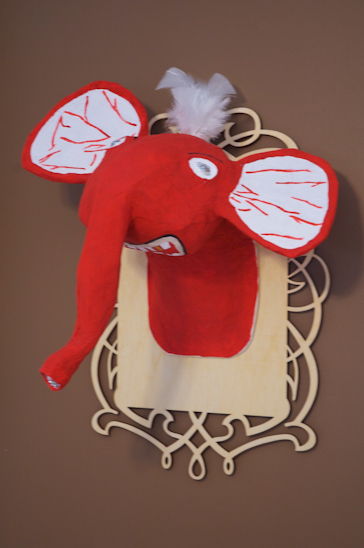
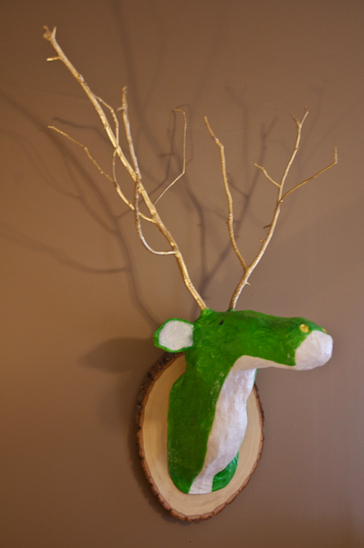
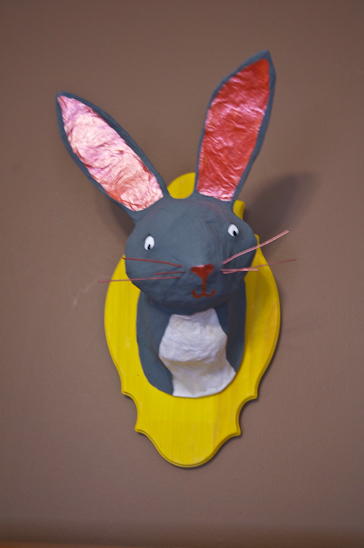
**See what else I’ve made for the nursery: DIY Plaster Animal Heads


Linking up to these Parties:

My Repurposed Life

The Shabby Nest

Just Wingin’ It 

French Country Cottage

My Romantic Home

Bacon Time


Read more

DIY Plaster Animal Heads

I am in the throes of decorating our nursery. I know that our baby won’t care what the room looks like. Heck-as a baby-I removed the paint my father laboriously put on my nursery walls with a wet wipe.

However, since I will be spending an inordinate amount of time in this room, I wanted some pretties to look at. And, of course, I didn’t want to spend very much doing so-thus my DIY Plaster Animal Heads. If you have the patience of a cucumber and a few hours each day, you too can have very inexpensive animal heads custom made to your liking!


Plaster Heads Begin
Here’s all that you’ll need to make your DIY Plaster Animal Heads:

Newspaper, Packing Paper
Paper Towels
Masking Tape
Cardboard
Mod Podge
Tissue Paper, Book Pages
Paintbrushes, Paint
Glitter, other accessories to decorate if desired
Plaque (I bought mine from a hobby store)
Brad Nails, Hammer
Flour, Water

Step 1:
Cut out a piece of cardboard that will be the backer to the animal head. Make sure it’s smaller than the plaque that’s been chosen.
Step 2:
Make balls out of newspaper or packing paper that will be the animal head and neck. Tape the balls together individually.
Step 3:
Tape the entire head and neck together.


Plaster Step 2
Step 4:
Add a final layer of newspaper to smooth out any valleys and build up any areas that are needed for the contour of the head. Use masking tape to attach the newspaper and the cardboard backer to each head.


Plaster Step 3
Step 5:
Use 4 parts water to 1 part flour to make the “plaster”. Heat up on stove and slowly whisk in flour until the consistency is a thick and soupy. Let cool.
Step 6:
Cut paper towels into 3″ x 4″ rectangles, or somewhere close to that size. I cut my select-a-size in half. Dip into the soupy plaster and squeeze off the excess.
Step 7:
Using one paper towel at a time, add a single layer of the paper towels to the head and cardboard backer.
Step 8:
Cover the entire head and cardboard backer with the plaster paper towels.


Plaster Step 4
Step 9:
Let the head(s) dry completely overnight or for several hours. It was very cold out, so I placed my heads in a small bathroom and used a space heater (safely) to speed up the process. Rotate the heads and make sure the cardboard backer is completely dry as well.


Plaster Step 5
Step 10:
Cut out ears for each head and use masking tape to attach to the heads.


Plaster Step 6
Step 11:
Use another round of plaster and paper towels to build up eye and nose formations. Cover the entire head once more, along with the cardboard backer and the ears with another layer of paper towels.
Let the head(s) dry completely overnight.

While you’re waiting on them to dry, paint your plaques!


Potholes and Pantyhose
Step 12:
Once the head(s) are completely dry, attach to the painted plaque by gently using brad nails and a hammer. (I went the extra mile and added a little hot glue to the cardboard backer before attaching it to the plaque. I don’t think this step was necessary, but it made me feel better.)


Plaster Step 8
Step 13 Alternate (1):
Here comes the fun part-decorating the heads! There are many ways to do this. Here you can see that I used mod podge and the pages of a book to cover the entire head. After cutting out a stack of small pieces from a book, I brushed a thin layer of mod podge on the back side. I placed the piece on the head and brushed another thin layer over the top. I repeated this process until the whole head was covered.

I had five heads, so I covered two with book pages.


Plaster Step 9
Step 13 Alternate (2):
Here, I used the same mod podge process, but utilized fun tissue paper instead. I covered the three remaining heads with tissue paper.


Plaster Step 10
Step 14:
Now, it’s time to paint! Get creative and crazy. Add glitter, rhinestones, mirror pieces, wires for whiskers, feathers, or whatever you have on hand. (Let dry completely between coats of paint).


Potholes and Pantyhose
Here are my finished heads. This one I call Frank the Zebra.


Potholes and Pantyhose
This is Lightening McQueenFox.


Potholes and Pantyhose
This is Goldy the Elephant.


Potholes and Pantyhose
This is George. Just George.


Potholes and Pantyhose
And this is Twinkles the Bunny.

I figured that I saved about $700 making these myself. Not bad for a few days’ work. If you made an animal head, what would it be?

Read more

Painting Like a Pro-Step by Step

Owning rental properties along with my own home, I have learned what works and what doesn’t in the painting department. Today, I want to share a few tips with you on how to paint like a pro.

I will warn you, once you learn how to paint properly, you will begin to notice shoddy painting and want to talk about it with husbands and friends….which usually aren’t that interested in the subject. Unless they’re freaks like me.

Here’s all that you’ll need in order to paint like a pro:
Lightweight Spackling
Wood Fill
Fine Sand Paper
Primer
Paint (can opener, stir stick)
Painter’s 2″ Blue Tape
Masking Tape
Plastic Drop Cloth
Brilliant White Acrylic Latex Painter’s Caulk-no Silicone and Caulk Gun (I recommend buying one with a tension release lever)
Roller, Roller Cage, Roller Pan & Plastic Liner
2.5-3″ Paintbrush-I recommend Purdy brand because they don’t fall apart or leave bristles in the paint


First things first. Lay out the plastic dropcloth and use the masking tape to tape seams together.
1. Fill nail holes and low spots on the wall using your finger to spread lightweight spackling into the hole.
2. Let the spackling bubble over the surface of the wall a centimeter or two. Once dry, lightly sand the spackling by hand with the sandpaper.
3. Brush a thin coat of primer on all the spackled spots. Let dry.


Next, use the blue painter’s tape to help create a perfect line between the trim and the wall color.
1. Apply the blue painter’s tape onto the trim leaving a 1/16 to 1/8″ gap between the trim and the wall.
2 (& 4). Using a box knife, cut a slanted tip on the end of the caulk tube. Insert the tube into the caulk gun and begin squeezing out a line of caulk along the edge of the blue tape. Do this process in 6′ increments to avoid letting the caulk dry out.
3. With each 6′ increment, use the index finger to run along the line of caulk, removing excess caulk. The goal is to create a seal between the wall color and the trim (that the blue painter’s tape is protecting). You don’t need a huge line of caulk, just enough that the blue tape shows through the caulk and a seal is formed. Have a wet rag handy to wipe your fingers on. It’s going to get messy.
4. Continue this process until all windows, doors, crown moulding and floor trim are taped off and caulked.


Once the caulk is dry, it’s time to load your brushes and rollers in preparation to paint. I know this isn’t the paint that I have picked out for my living room, but it does the job!
1. Label the can of paint before you start with a permanent marker. (This will save future headaches of not knowing which paint goes to which room-Lowe’s also offers the option to keep track of your paint colors online.) Slowly open the can using a paint key (given to you free at the paint counter) by going around the entire rim of the lid. Lift the lid straight up to avoid drips.
2. Use a stir stick to mix up the paint (even if it’s already been mixed in the store). The pigment will settle at the bottom. Pull up from the bottom with the stir stick and then stir in a circular fashion one or two times. Repeat this process until the paint is thoroughly mixed.
3. Properly load a paint brush by dipping into the paint about 1/4″ and scraping the brush against both sides on the paint can.
4. Properly load a roller by pouring paint into the paint tray (with liner), using a paint brush to catch drips from the can. Begin by lightly dipping one side of the roller into the paint and dragging the roller back towards you in the pan. Do this several times until the roller is fully loaded all the way around.


Now that we have our walls prepped, the floor protected and the trim ready to receive paint, it’s time to slap on the color!
1. First, you “cut in” the trim before rolling the walls. With your loaded paintbrush, give the brush a slight angle as you “cut in” along the trim. The “cutting in” should be one motion, pulling the paint from left to right (if you are right handed). You shouldn’t be brushing back and forth-this will create thick spots and lines in the paint.
2. Some of the paint will be seen on the blue tape-this is exactly why we have the tape and caulk protecting the trim.
3. Next, roll the walls with a loaded roller. Use a “W” pattern as you roll in the walls. This will help avoid lines being formed in the paint.
4. Once the first coat is dry, apply a second coat if need be. Also, scan the walls for “holidays” which are formed by air bubbles in the paint finally popping and leaving behind tiny see-through spots. Touch up where it is necessary.


Until I am 100% certain that there will be no further touch up, I bag up my brushes and my rollers.
1. Pour all excess paint back into the can, using the brush to make sure you have removed as much as you can from the paint tray liner.
2. Wipe the rim of the paint can so that it can be sealed properly.
3. Tap the lid on with a hammer, going around the entire rim.
4. Bag up the liner, the roller and the brush with plastic bags, sealing them off as much as you can from outside air. This will keep the paint wet in case you missed a spot.


If you are certain that there will be no further touch up, it’s time to clean the brush and roller.
1. Use lukewarm water and a mild soap to clean the brush. If there is stubborn stuck on paint, use a wire brush pulling lightly from the handle towards the edge of the brush.
2. Squeeze the excess water out of the brush or roller.
3. Lay flat to dry (either outside or on a paper towel to protect the surface it’s laying on-there often is excess paint that dribbles out over time).


Now, the reveal!
1. Once the paint is dry, it’s time to pull the blue painter’s tape from the trim. Do not wait more than a few days to pull the painter’s tape from the trim. Grab one end of the tape and pull towards you with a 27 degree angle (in between a 0 degree and a 45 degree angle). Pull slowly, allowing the caulk to tear it.
2. If the caulk was applied too thick, it may begin to pull the paint from the wall along with it. If you notice this starting to happen, use a box knife to help create a clean line. If the caulk was applied properly, you will have a beautiful clean line between your wall color and your trim.


Now that the brushes are clean, the tape has been pulled and everything has been put away, stand back and enjoy the brand new color on your walls. And the fact that you just painted like a pro.

PS-Here’s the full Master Bathroom Remodel-Part Uno and Part Deux for your ocular senses!

Read more

Installing Picture Frame Molding

I was inspired by this professionally designed living room and wanted to make changes similar in both my living and dining room.

Photo Source Woodson and Rummerfield’s House of Design
Molding can inexpensively transform a bland wall (which I definitely had) into a showpiece (ka-pow!).


Picture Frame Installed

This is the simple picture frame molding that I installed in my living room. And once I slather some fancy blue paint on it-the “ka-pow” will be happening.

It’s so simple to do, you won’t believe it. Let me show you how!


Here is all that’s needed to install Picture Frame Molding properly:
Skill Level: Easy
Time to Finish Project: Varying depending on size, approx. 30-45 minutes per frame

Chop Saw (or hand saw and a manual miter box able to cut a 45 degree angle)
Brad Nailer, 1 1/2″ Brad Nails, Air Compressor & Hose (or brad nails, hammer and nail set)
Level
Tape Measure
Stud Finder
Molding
Paint
Spackling
Bright White Painter’s Caulk (no silicone) and Caulk Gun
Paintbrush
Blue Painter’s Tape (only if painting the molding a different color from the wall)


Steps 1-4
1. After determining the size of the picture frame, cut the molding to length. I had (4) pieces, cut 2′ long to make my frame. Set the chop saw to cut a 45 degree angles from Right to Left.
2. Cut a 45 degree angle Right to Left on one end of each piece of trim.
3. Switch the 45 degree angle on the chop saw to cut Left to Right. On the uncut end of the trim, cut a 45 degree angle left to right.
4. Make sure the trim fits together in each of the four corners.


Steps 5-8
5. Using a stud finder, determine and mark where the studs in the wall are in relationship to where you will be placing the frame.
6. Begin with the top piece of the frame and level.
7. Position the nail gun over the stud and shoot through the molding and into the stud. (If there are no studs where you desire to place the trim, shoot the nails through the molding at an angle, coming first from the right, then the left and so on until the molding is secure.)
8. Now, repeat these steps with each of the vertical side pieces of molding and finish with the bottom horizontal piece.


Steps 9-12
9. Once all of the molding is installed, fill the nail holes with spackling.
10. If you are painting the molding a different color than the wall, use the blue painter’s tape and first tape off the wall surrounding the picture frame, leaving an 1/8″ gap between the molding and the wall. Caulk the corner seams of the molding with Bright White Painter’s Caulk.
11. Caulk the inside and outside seams of the molding. If you are painting the molding a different color, the caulk will seal the seams and create a barrier between the wall and the paint color.
12. Remove excess caulk using an index finger, sealing the seams.


TrimCut in
Next up-paint! I wanted my trim to be wall color. If you would like your trim a different color than your wall, all you will need to do is tape and caulk the surrounding trim and cut in the trim with a brush.

Easy peasy!
 

Read more