Tag Archive for: vintage

Vintage Embroidered Pillow Case Shirt

This pretty little pillowcase has been lingering in my linen closet for years; very much neglected.
I liked it so much that I didn’t want to risk
ruining it…by using it.
Once I realized how crazy that logic was, I decided to put it to good use.
I mean, what’s next? Covering my couch in plastic?

I wear jeans with this cutesy little shirt because it hits me about mid-thigh.
It’s almost long enough to be a dress, but being an ORU graduate…I have been trained that ‘modest is hottest’.

HAH HAH HAHAHAHAHAHH!
Phew…had to get that out of my system….


Here’s what you’ll need for your own pillowcase shirt:
2 feet of 2”+ stiff lace-I added a decorative 1/4” lace on top of the 2” lace
Iron on hem tape-only if you add decorative lace as I did
Thread to match
Scissors
Tape measure
Pillowcase


First step: make sure your cat approves of the pillowcase. You can test this by allowing him to make a nest on the material.


Cut the seam from the end of the pillowcase.


Fold under and iron 1/4” on the cut end of the pillowcase.


Fold the 1/4” over 1” more and iron. This will be the top hem of your shirt. Sew that sucker in place, stitching as close to the bottom and to the top of the 1” of material-creating two seams.


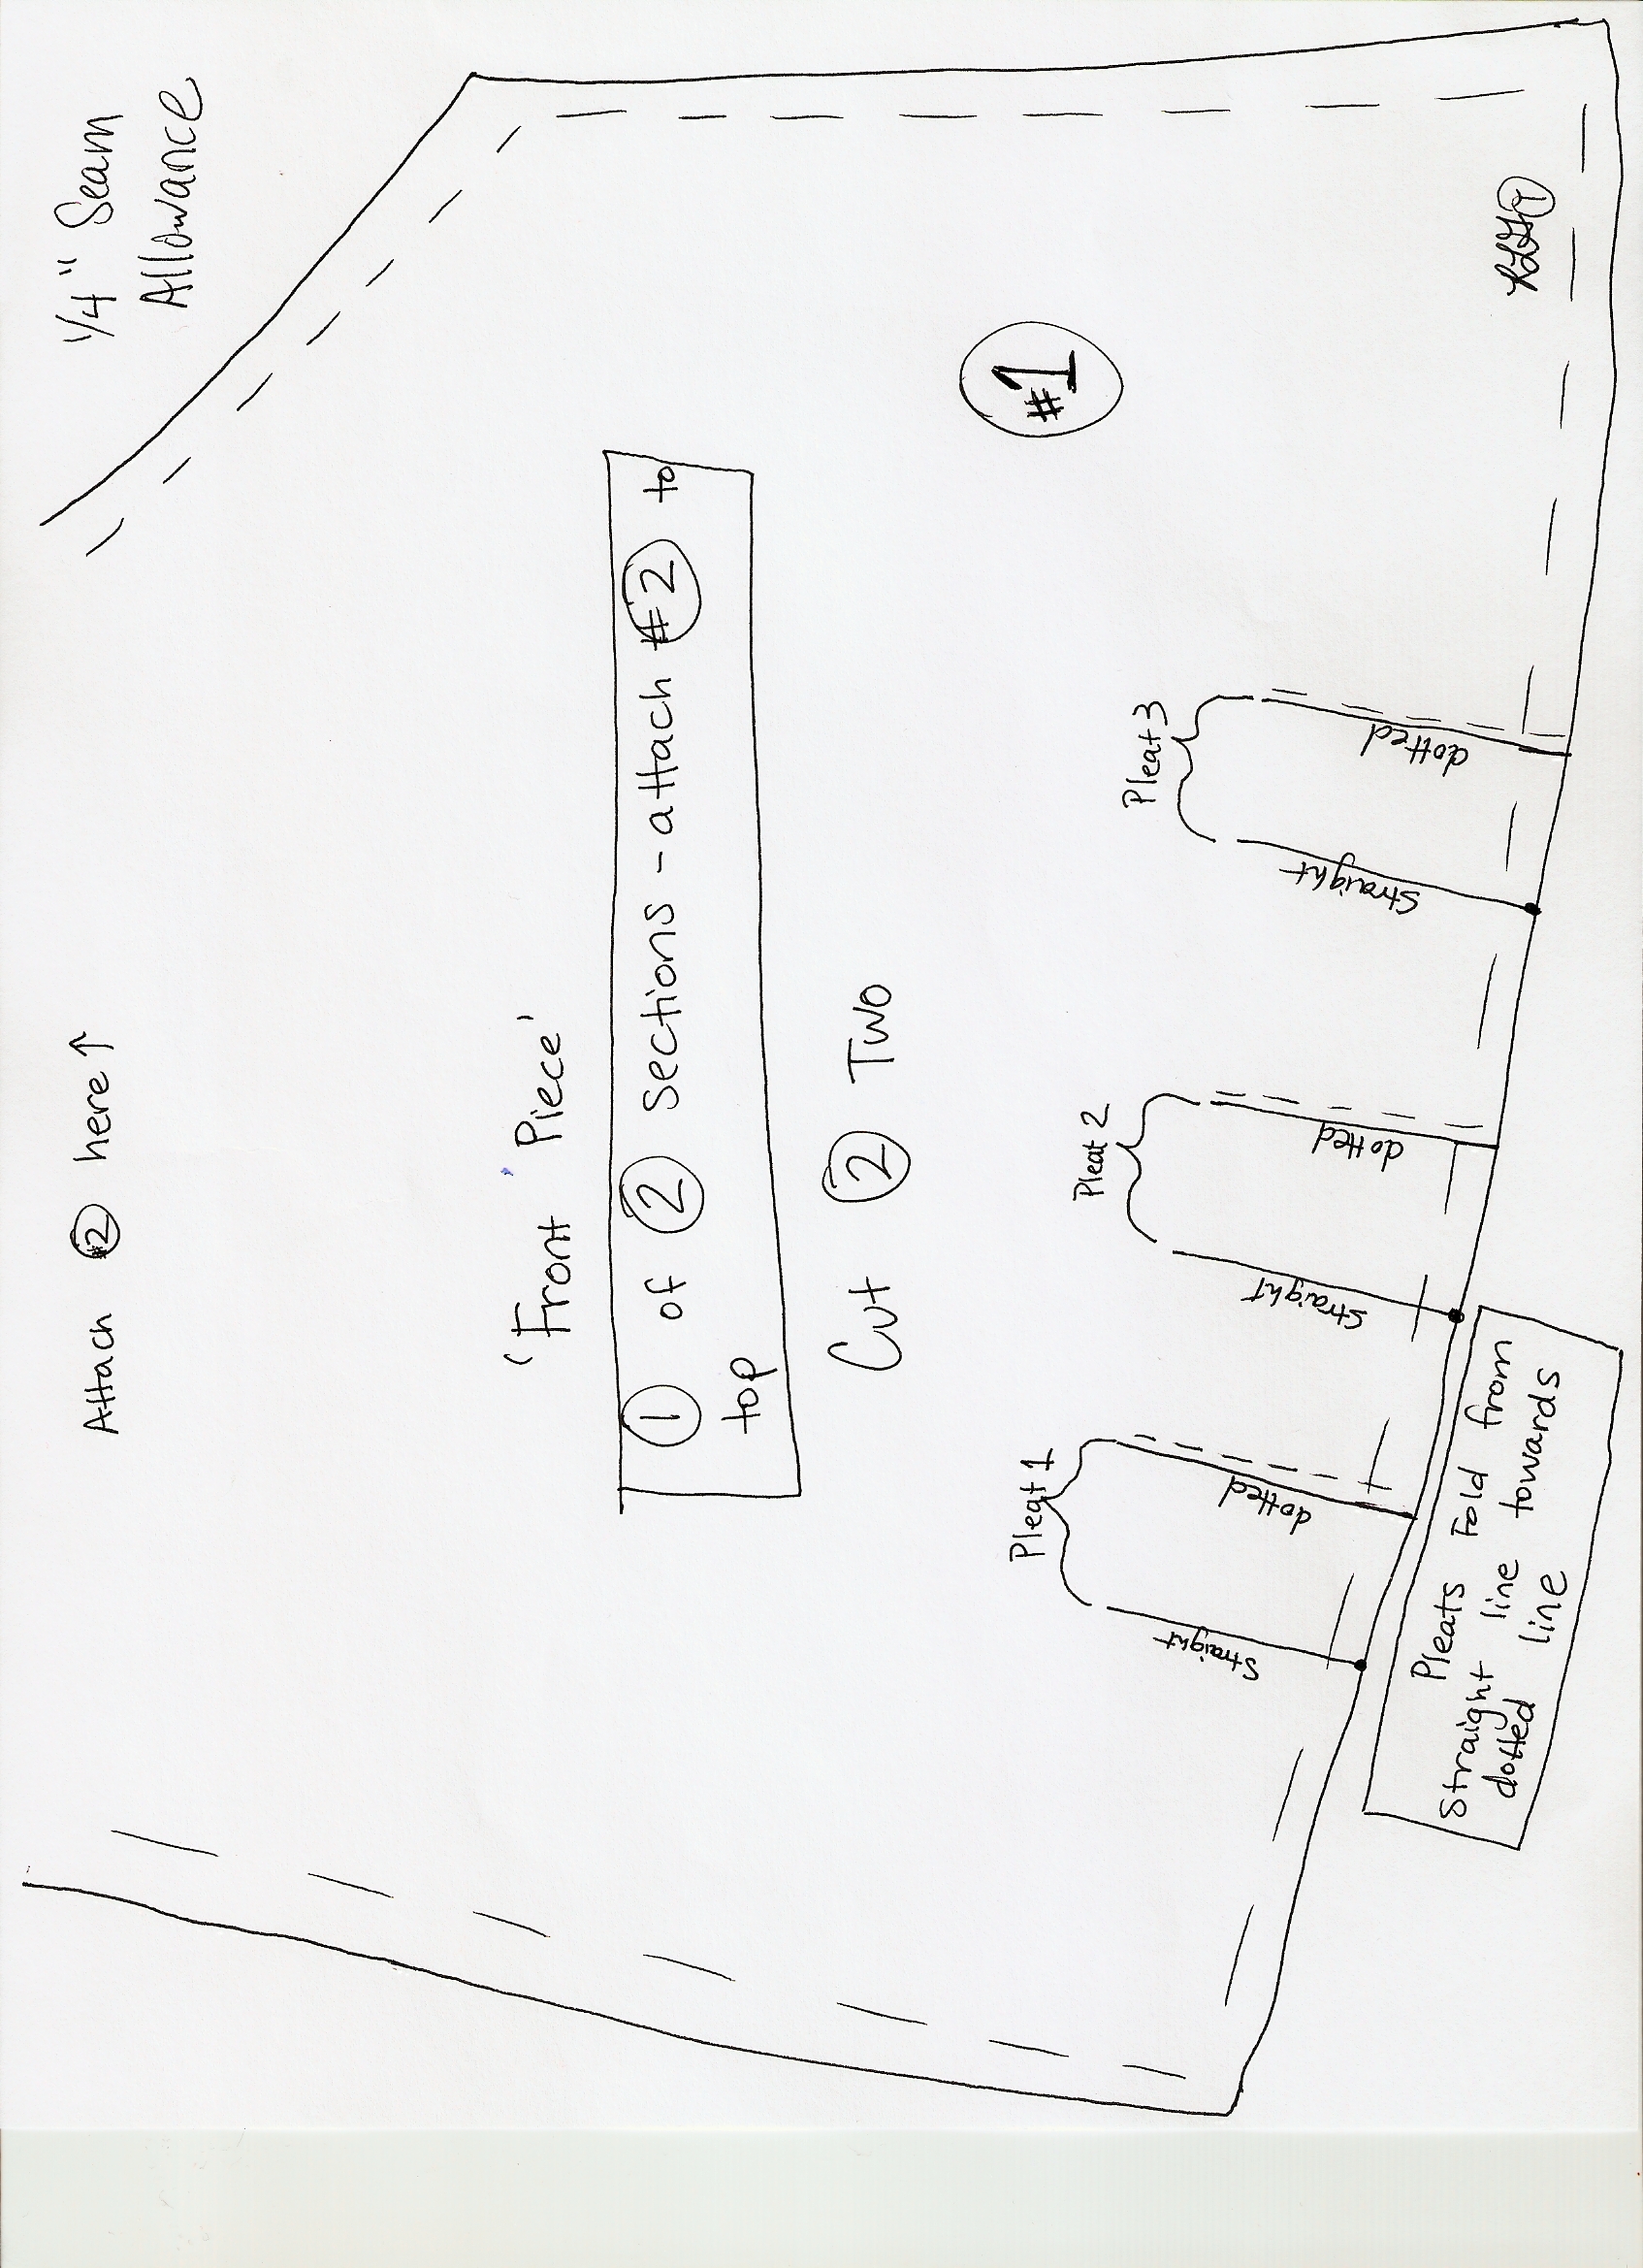
I slipped the pillow case over my head and found that I had 9” of excess material around my chest. Starting from the front and center of my shirt, I divided the 9” of excess material into 7 equal pleats-one center pleat and three pleats on either side of center.
I pinned all of the pleats into place and ironed them flat.


I sewed on top of my old seams, making the pleats permanent.


Using an iron-on hem tape, I added a 1/4” decorative lace on top of my 2” lace, just for kicks and giggles.
Make sure your ironing board cover is absolutely disgusting like mine is.


These pretty little things will be the straps to my shirt.


Find center of your shirt, measuring out 4” on either side.
Find center of your straps and pin them at the 4” mark.
Do the same for the back of the shirt.


Following your old two seam lines, stitch your straps into place on the front and back of your shirt.


Sometimes, when I am really sassy, I’ll throw a belt around my shirt.
See what I mean about it almost being long enough to be a dress?
It’s just a little more thigh than I am comfortable with in public.
And sorry you had to see so much thigh.


Here’s the back of my cute shirt.
I have worn it mostly without a belt because I like the free and flowy feeling.
Also without a belt, I am able to gorge myself on chips and salsa. Or be pregnant with no one the wiser about my ‘condition’. Or smuggle in snacks to a dollar movie. Not that I I would do any of that.
But, it’s nice to know I have options.
Hope you like it!

Read more

Vintage Paint by Numbers

Many times when Biceps and I are out on tour, milling about in some thrift store, I see them. They call to me.
They tell me they need a home, that they are sweet and colorful and lonely.
But, like my retro refrigerator dishes, I have been banned from buying anymore Paint by Numbers.

So my obsession currently stops with these below.

This was my first paint by numbers. My virgin purchase, if you will. I fell in love with this forlorn puppy, and for $12 it was mine.

He resides in our guest bedroom, and if you ever visit, he will watch over all of your goodies and not let Cowboy sit on them.

I bought this at what was advertised as an ‘Estate Sale’.
‘Estate’ it was not. The house was weird, stinky and had an entire notebook filled with the lives and deaths of numerous bunny rabbits the owner apparently kept.

I disinfected Jesus properly as soon as I got home.

Grandma Greiman painted the next three you will feast your eyes upon.
This one was never framed or displayed in her home. I am excited to exhibit it in my home as soon as I can convince Biceps it fits into our decor.

Notice Grandma’s take on the colors on this painting versus the one above I bought at stinky rabbit house?
We recently found out that Grandma is color blind. How cute is that? She has never known this all these years!

This paint by numbers, I believe, is the creme de la creme. I slept many a night under the watchful eye of Jesus at the farmhouse in Iowa. This was my one request when she decided to move to town.

I needed Jesus. And Jesus was given to me.
Isn’t that just typical of Him?

Read more

Va-Va-Voom Vintage Tablecloth Dress

Grandma Greiman sent me away from her farm with a trailer full of treasures.
This old tablecloth was barely holding on to its original embroidered flowers and I couldn’t bear to throw it out or tear it up into scraps.
So, why not throw in a scarf for good measure and make a dress?

Scarves have become one of my favorite fabric pieces to re-invent.
They are the perfect material for molding into free-flowing sassy pieces. And boy am I into the sass. You have no idea.


I created my own pattern for this dress by trial and error. (My pattern was made for me, and I am a size two. If you would like to increase the size, a general rule is to add 1/4” all the way around per size increase.)

To Make this Dress, you’ll need:
Four Pattern Pieces (Front Piece #1, Front Piece #2, Back Piece, Middle Piece)
One Large Silk Scarf
Cotton backing fabric the same size as the scarf
Round Tablecloth (mine was 66” in diameter)
20” Zipper
Straight Pins
Scissors
Seam Ripper (If your expertise is anything like mine)
Thread to Match
Sewing Machine

Fold your scarf in half and lay your pattern on top of it. Cut out two ‘back pieces’, two ‘front pieces’ and one middle piece.

Repeat this procedure with the cotton backing fabric.


With the right side of your fabric down, pin the pleats in your two front pieces and iron them flat.
Then pin the two front pieces to your middle piece and sew.
Make sure you sew the neck pieces together as well.


Pin & sew your two ‘back’ pieces to what you had just sewn together.


We are going to repeat this process with your scarf. But since I am a visual learner, I will go ahead and do it all over again for you. With the right side of your scarf fabric down, pin your pleats in the ‘front’ pieces first and iron them flat.
Now, pin your two ‘front’ pieces to your ‘middle’ piece and sew.
Make sure you sew the neck pieces together as well.


Pin & sew your two ‘back’ pieces to what you had just sewn together.
This seems all too familiar….


With right sides of your material together, pin your scarf to your cotton backing material. Sew all of your outside seams together, leaving the bottom open. We will now call this the ‘Top Piece’.


Fold your round tablecloth in half and place it on top of the right side of the material to your Top Piece.
Find the center of your folded tablecloth and pin it to the center of the bottom of your ‘Top Piece’.
Working from the center out, pin the folded tablecloth around the entirety of your top piece. Sew the Top and Bottom pieces together.
I added pleats to my tablecloth ‘Bottom Piece’, just in case I partake of a single scoop of peppermint ice cream in a waffle cone…but you do what you want.


Next comes the zipper. My favorite part. Notice my text is oozing with sarcasm.
I have never liked putting in zippers. I don’t know why…I just don’t.
Anywho…fold the right side of your fabric over a quarter of an inch on your Top Piece and pin your zipper on the inside of the material.
Do NOT fold over your material on your Bottom Piece. Pin the zipper directly to the material, leaving the excess to do as it pleases.
Give your Booty some room to breath by fanning the zipper away from the waist until you reach the end of the zipper on the Bottom Piece. (Mine needed an extra 2” from waist to end of zipper.)
Sew your zipper into place on both sides.


Here is the finished VA-VA-VOOM Vintage Tablecloth Dress.
Mine and the dress’ backside is below.


I can’t wait to wear this little piece out on the town! Now, to convince Biceps we need a night out on the town…..

Read more

Modern Engagement with a Vintage Feel

Today, I am highlighting one of my favorite photographers, Justin Greiman.
(He also happens to be my Hubby’s brother.)
Justin shoots bands, babies, weddings and everything in between. His patient and humble approach to his clients is earning him a reputation not only as a great photographer, but also as a great guy to work with.
Plus, his photos pretty much rule.

Justin recently shot this series for this couple’s engagement. I love the deep saturation of color, the vintage feel, the hat-tipping to a time when men mowed the grass in a tie and women wore heels while cooking.
My hubby is lucky to see me outside of lounge pants.

(Justin shot all of these with a Nikon D90 at ISO 400. He used 28mm and a 50mm lenses for this shoot. He used partially available light, with a little fill from one sb800 in a 15″ softbox. He edited them in Lightroom using Color Efex Pro 3.0, a plugin from Nik Software.)


Justin captured a story with these next three shots. They intrigue me and I want to know more.


She seems pretty upset about something.


Her anger turns to sass, which is what mine usually does as well.
I get her.


His arms crack me up. They sell the vintage feel of the shot, as does the yellowed effect.
She looks perfectly posed; just like a print ad from the 60’s.


Could they be any more cute? Doubt it.


This is one of my favorites from the entire shoot. The mood draws you in, the graininess of the portrait softening the shot. It seems intimate, as if you are seeing a small snippet of their life that no one else gets to see.
Thank you Beau and Chrissie for allowing me to show off your engagement pictures. And congrats on the upcoming wedding!
And thank you Justin Greiman for taking such wonderful pictures. Go check him out-he’ll blow your little socks off!

Read more