Archive for category: At Home…

Of Family: Fears and Failures

You may argue with me, but my family is the best. My parents have always been consistently faithful to each other, to us as role models and to their commitment to lead a Godly life.


Matlach Family Thanksgiving 2012-Fun
However, we aren’t without our mistakes. And I’m not without my regrets as to how I’ve treated them, what I’ve said  or my crappy attitudes when they don’t do what I want them to do.


Matlach Family
Each time we all get together, I tell myself that I’m going to be mature, I’m going to respond with grace and humility and I’ll give to them generously.

But I don’t. I act like a bratty 8 year old. I fail terribly. I get crabby. I demand my way. I get ticked off, retreat to my closet, eat chocolate and cry. And pet the cat(s). Thank God for cats. Seriously.


Matlach Family Thanksgiving 2012-Siblings
Then, I crawl back to the party I’ve offended and ask for forgiveness. It’s the same dooloop over and over again. I feel hopeless that I’ll ever really change. And you’d think I’d learn.


Arrested Xmas-Rebekah, Side
After all, I’m old enough to know better, I’m a mother in waiting, supposedly a “professional” and a wife of 12 years. But 8-year-old-Becky rears her ugly head time after time after time after time…


jesus
I’m so thankful for the Creator of the universe and for His forgiveness. Otherwise, I may end up seriously hopeless-never leaving my closet, nutritionally destitute from my steady chocolate diet and perhaps even rejected by my cats due to stinkyness.

But in Him I find hope that I can and I will change-with His help.

“If you, Lord, kept a record of sins, Lord, who could stand? But with you there is forgiveness, so that we can, with reverence, serve you. I wait for the Lord, my whole being waits, and in his word I put my hope.” Psalm 130:3-5

Like me, you may have difficulties with the people you love the most. My intention with my vulnerability is to encourage you out of the stinky, chocolate-laden closet while in pursuit of His cleansing forgiveness.

Don’t give up hope. In Him there is hope!


Read more

The 2013 Christmas Card Reveal

While the majority of humans ramp up for their annual family Christmas photo with matching wardrobes (including coordinating hats and gloves), perfectly manicured outdoor scenes complete with snow, and fussy–but bribed children…Biceps and I decidedly go a little different route. (Go here to see the last 12 years of our Christmas Card Photo weirdness. You know you want to.) 

Typically, our Christmas card photo preparation begins at a thrift store buying things I’m embarrassed to purchase. I then move on to my bag of props and costumes found on the floor of my guest bedroom closet. Lots of laughing is involved. And lastly, I’m usually at Lowe’s or Home Depot loading up stacks of lumber, paint cans or pieces of sheetrock–for those final touches.

I’ve never looked pretty in these photos. I’ve never thought, “Wow, Crossfit really pays off” as I edit, print and crop the final Christmas photo choice.

Instead, Biceps and I could be overheard saying such things as, “Yeah, you look really terrible in this one. That’s the one!”, or “Oh, your face looks super creepy in that one. Perfect!”. We enjoy the hideousness that we can conjure up in one single photo.

So, without further delay….here is our 2013 Christmas Card Photo Reveal!


2013-Xmas Final Photo-Cropped
A few fun facts about this photo:
1. Yes, that is an Atari system. But it’s a brand new “wireless” one that we taped mic cords onto to make it look vintage.
2. I am wearing a “retainer” made from a paperclip.
3. The Jesus paint-by-numbers was done by Grandma Greiman and hangs in our guest bedroom.
4. The books behind my head are the complete set of “Anne of Green Gables”.
5. I do own the rainbow belt and wear it often.
6. The squirrel and slinky deer are ours and they do decorate our house presently.
7. The paneling is not. It was a Lowe’s purchase, propped against our breakfast nook wall.
8. My baby bump is showing and there was nothing I could do about it.

I hope you’ve enjoyed yet another year of weirdness. And, if you feel like you’ve been missing out on the other Christmas weirdness-which you most certainly have-check out the rest of our Christmas Card Photos. Enjoy.
 

Read more

What is my Mom thinking? (Installment #2 by Baby Greiman)

Dear Readers:

Baby G again, here. I’m past the 20 week mark and I’ve started to hear–a lot. Which means that I’ve started to assimilate some information as to who this woman is carrying me around.

I’ve heard her boisterous laugh that only a few get to hear. She usually tones it down for normal human consumption. But, Dad and I? We hear it all.

Rebekah GDGC

This-this-is my mom. She’s weird and eccentric. She runs into walls and corners of countertops. She drops hot coffee all over herself and her response is: “Geez, oh Pete’s”. (The only other participants of that phrase are avid users of denture cream and are pushing 90.)

She also sings at the top of her lungs while on the treadmill and sometimes gets so into it, she falls off the side. When she’s done singing-or just bruised up a bit, she prays. Usually, she starts with her parents, my Dad’s parents, then moves onto the siblings, then their kids, then me (“baby G”) and rounds it out with world events (which unfortunately she mixes up and ends up praying for Nelson Mandela; who she thought was sick and was in fact, dead).

Rebekah Normal


But, you see this side of her. Calm, collected, composed. Holding in farts. Not spitting while talking.


Rebekah Goof


This is instead the reality of my Mom. That’s one of her favorite faces to make, take a picture of and text to loved ones. She cannot grasp the “looking into the camera lens, rather than the front of the phone” concept. And, she is probably both spitting and farting at the time.

However, she has nice teeth. So, there’s that.


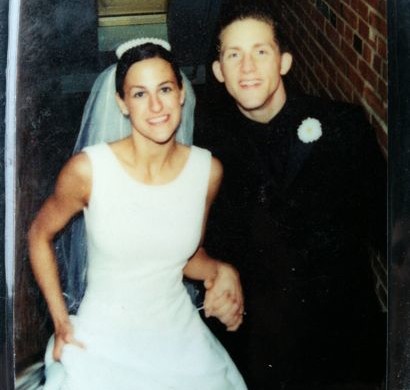
Kayle and Rebekah Wedding


I’m just beginning to get to know these two. They started off normal enough-or so she says. She was a tough woman, working for a marketing company, and he was in a loud, unruly rock band. He wouldn’t wear shorts in the summer, she preferred dresses year ’round.


Kayle and Rebekah Celebrate

Years have passed and she’s become more comfortable in her skin, she tells me. She doesn’t feel the need to be tough. I’ve heard her cry over stories of animal cruelty and during commercials where soldiers return home. That’s normal.

But, then she cries while watching puppies eat on the Jimmy Fallon show. Makes no sense to me.

I think she’s been encouraged to be more herself (a.k.a. more weird) by that guy on the right.

Baby

And, they haven’t wanted to find out if I am a boy or a girl. So, they refer to me as either “Baby G” or “he/she”. Talk about confusing a little brain.

Just wait until I get into the open air and rock their world. Watch out, Mom and Dad. I’ve heard a lot of secrets, weirdness and farting-and I’m not afraid to use this information to my advantage.

Baby G out.


Read more

Painting Like a Pro-Step by Step

Owning rental properties along with my own home, I have learned what works and what doesn’t in the painting department. Today, I want to share a few tips with you on how to paint like a pro.
I will warn you, once you learn how to paint properly, you will begin to notice shoddy painting and want to talk about it with husbands and friends….which usually aren’t that interested in the subject. Unless they’re freaks like me.

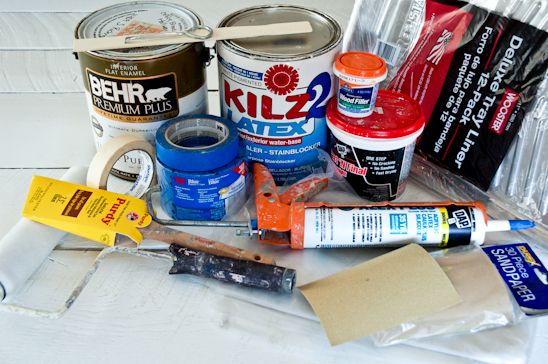
Here’s all that you’ll need in order to paint like a pro:
Lightweight Spackling
Wood Fill
Fine Sand Paper
Primer
Paint (can opener, stir stick)
Painter’s 2″ Blue Tape
Masking Tape
Plastic Drop Cloth
Brilliant White Acrylic Latex Painter’s Caulk-no Silicone and Caulk Gun (I recommend buying one with a tension release lever)
Roller, Roller Cage, Roller Pan & Plastic Liner
2.5-3″ Paintbrush-I recommend Purdy brand because they don’t fall apart or leave bristles in the paint
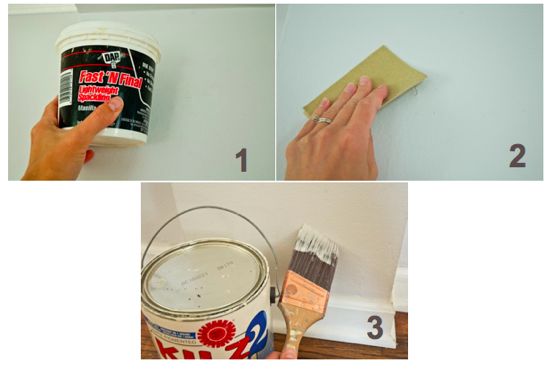


First things first. Lay out the plastic dropcloth and use the masking tape to tape seams together.
1. Fill nail holes and low spots on the wall using your finger to spread lightweight spackling into the hole.
2. Let the spackling bubble over the surface of the wall a centimeter or two. Once dry, lightly sand the spackling by hand with the sandpaper.
3. Brush a thin coat of primer on all the spackled spots. Let dry.
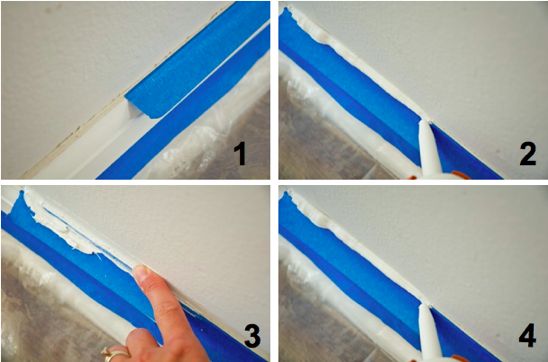


Next, use the blue painter’s tape to help create a perfect line between the trim and the wall color.
1. Apply the blue painter’s tape onto the trim leaving a 1/16 to 1/8″ gap between the trim and the wall.
2 (& 4). Using a box knife, cut a slanted tip on the end of the caulk tube. Insert the tube into the caulk gun and begin squeezing out a line of caulk along the edge of the blue tape. Do this process in 6′ increments to avoid letting the caulk dry out.
3. With each 6′ increment, use the index finger to run along the line of caulk, removing excess caulk. The goal is to create a seal between the wall color and the trim (that the blue painter’s tape is protecting). You don’t need a huge line of caulk, just enough that the blue tape shows through the caulk and a seal is formed. Have a wet rag handy to wipe your fingers on. It’s going to get messy.
4. Continue this process until all windows, doors, crown moulding and floor trim are taped off and caulked.
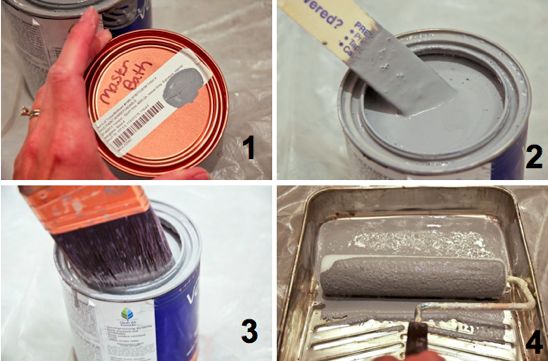


Once the caulk is dry, it’s time to load your brushes and rollers in preparation to paint. I know this isn’t the paint that I have picked out for my living room, but it does the job!
1. Label the can of paint before you start with a permanent marker. (This will save future headaches of not knowing which paint goes to which room-Lowe’s also offers the option to keep track of your paint colors online.) Slowly open the can using a paint key (given to you free at the paint counter) by going around the entire rim of the lid. Lift the lid straight up to avoid drips.
2. Use a stir stick to mix up the paint (even if it’s already been mixed in the store). The pigment will settle at the bottom. Pull up from the bottom with the stir stick and then stir in a circular fashion one or two times. Repeat this process until the paint is thoroughly mixed.
3. Properly load a paint brush by dipping into the paint about 1/4″ and scraping the brush against both sides on the paint can.
4. Properly load a roller by pouring paint into the paint tray (with liner), using a paint brush to catch drips from the can. Begin by lightly dipping one side of the roller into the paint and dragging the roller back towards you in the pan. Do this several times until the roller is fully loaded all the way around.
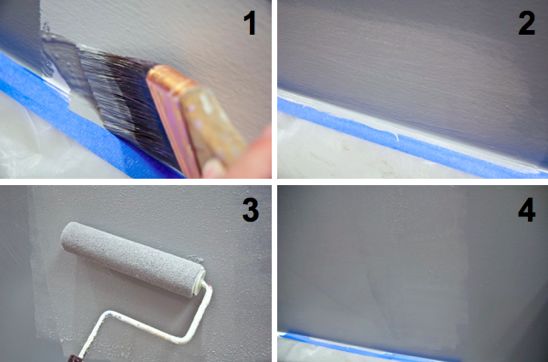


Now that we have our walls prepped, the floor protected and the trim ready to receive paint, it’s time to slap on the color!
1. First, you “cut in” the trim before rolling the walls. With your loaded paintbrush, give the brush a slight angle as you “cut in” along the trim. The “cutting in” should be one motion, pulling the paint from left to right (if you are right handed). You shouldn’t be brushing back and forth-this will create thick spots and lines in the paint.
2. Some of the paint will be seen on the blue tape-this is exactly why we have the tape and caulk protecting the trim.
3. Next, roll the walls with a loaded roller. Use a “W” pattern as you roll in the walls. This will help avoid lines being formed in the paint.
4. Once the first coat is dry, apply a second coat if need be. Also, scan the walls for “holidays” which are formed by air bubbles in the paint finally popping and leaving behind tiny see-through spots. Touch up where it is necessary.
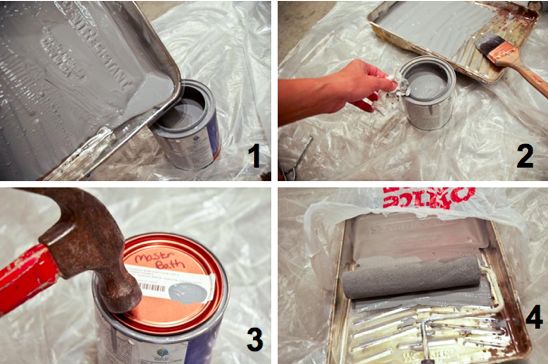


Until I am 100% certain that there will be no further touch up, I bag up my brushes and my rollers.
1. Pour all excess paint back into the can, using the brush to make sure you have removed as much as you can from the paint tray liner.
2. Wipe the rim of the paint can so that it can be sealed properly.
3. Tap the lid on with a hammer, going around the entire rim.
4. Bag up the liner, the roller and the brush with plastic bags, sealing them off as much as you can from outside air. This will keep the paint wet in case you missed a spot.
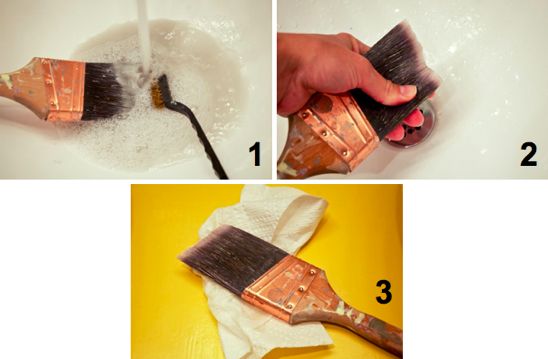


If you are certain that there will be no further touch up, it’s time to clean the brush and roller.
1. Use lukewarm water and a mild soap to clean the brush. If there is stubborn stuck on paint, use a wire brush pulling lightly from the handle towards the edge of the brush.
2. Squeeze the excess water out of the brush or roller.
3. Lay flat to dry (either outside or on a paper towel to protect the surface it’s laying on-there often is excess paint that dribbles out over time).
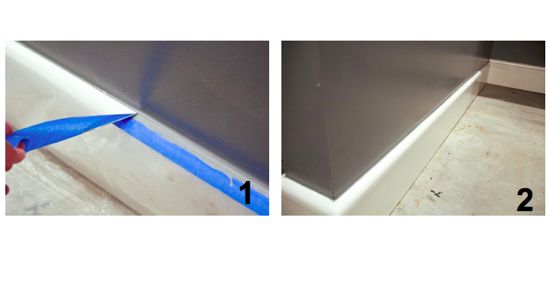


Now, the reveal!
1. Once the paint is dry, it’s time to pull the blue painter’s tape from the trim. Do not wait more than a few days to pull the painter’s tape from the trim. Grab one end of the tape and pull towards you with a 27 degree angle (in between a 0 degree and a 45 degree angle). Pull slowly, allowing the caulk to tear it.
2. If the caulk was applied too thick, it may begin to pull the paint from the wall along with it. If you notice this starting to happen, use a box knife to help create a clean line. If the caulk was applied properly, you will have a beautiful clean line between your wall color and your trim.


Now that the brushes are clean, the tape has been pulled and everything has been put away, stand back and enjoy the brand new color on your walls. And the fact that you just painted like a pro.

PS-Here’s the full Master Bathroom Remodel-Part Uno and Part Deux for your ocular senses!

Read more