DIY Family Board Game
Our families both appreciate hand-made gifts for Christmas-especially if the gifts are not of the socks or underwear variety.
So, when it came close to Christmas, Biceps and I decided to make a DIY Family Board Game for each side of our families.

The family loved it-who doesn’t like to hear questions asked about themselves?-and it has become a tradition to play our game together, adding new cards each year. I’ll show you around the game and then give you a step by step tutorial on how to do it yourself!

We personalized the entire game by creating question cards that pertain specifically to our family using old stories, funny memories and anything that might embarrass each one of us.

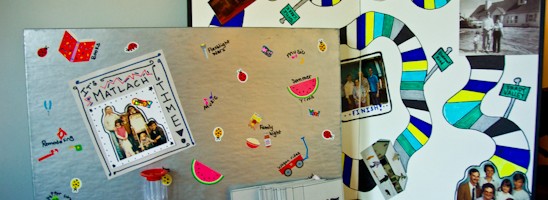
We harvested old family photos and glued them to the board, using street names from our hometown to guide the way around the board.

We also personalized game pieces that are meaningful to our family-my dad swears every year that the Christmas tree grows on the way home from the forest and he also can put away two ginormous bowls of popcorn in one sitting.

We then decorated the box with stickers and photos, recalling yesteryears of campfires, sleeping bag rides and such other childhood awesomeness.

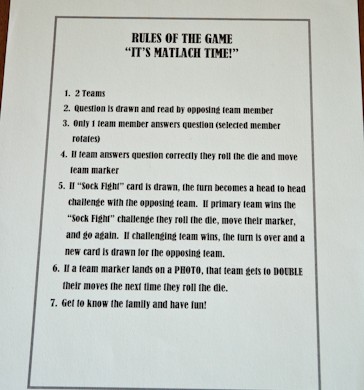
And of course, a very specific set of rules was implemented by the one and only rule giver-Biceps.
I don’t need no stinkin’ rules.
The rules are pretty simple-divide into two teams, one team draws a question card, but only one member of that team gets to answer the question. If they answer correctly, they roll the dice and move that many spaces. Then the next team goes.
BUT-if you land on a “Launchpad” (a photo along the path), you get to double your roll the next go around.
Pretty simple. Except Biceps threw in a bunch of more rules…he is such a rule monger…

It was a rather simple process to make the game and a bonus was the miniscule financial investment. Like $4.00 or so. The whole idea was a real win-win.
Now since you have witnessed all of this DIY Family Board Game-let me tell you how I made it!

Here’s what you’ll need to make your very own board game:
An old, neglected board game (I don’t understand Parcheesi, so it was sacrificed)
15-20 sheets of Card Stock (for the question cards, I used gray)
4-6 Sheets of Card Stock (to cover the board, I used a light tan)
Rubber Cement
Markers
Old Family Photos
Stickers (optional)
To play the game:
Game Pieces (I used a mini tree and popcorn box I already had on hand and hot glued it to a penny)
Dice
Timer (I bought mine at a educational supply store for $3)
Playdough (not pictured-it dried out because of inadequate lid tightening and I need to buy some new ‘dough. Deal with it.)

Rubber Cement the card stock to the game board. Pay heed to the folds in the board and cut your card stock accordingly.

Once the board is covered and the rubber cement is dry, cut out family photos to decorate the board with. These photos became our “launchpad”-meaning, if you landed on them you got some sort of bonus roll/move.

Glue your photos down, making a definitive “START” and “STOP”.

In between the “START” & “STOP”, create a meandering and colorful path around the board, spicing up the path with the occasional photo (Launchpad).

Now, paint, cover with a fabric or whatever decor you desire to the outside of the game’s box. Add additional stickers, sayings, or more photos that mean something to you and yours.

Here is an example of our rule sheet printed out on card stock. They are your typical multiple player board game rules with specifics thrown in for our family.
You may copy these rules for yourself, make up your own, or just make them up as you go along-that could get exciting.

Up until now, things have been smooth sailing for you. Now comes the slightly more difficult task of creating questions. We tried to make sure our questions had a specific answer, were known by most family members, and slightly obtuse.
For example, instead of: “What is Grandpa’s first name?”
Asking: “What was Grandpa called as a boy following a disturbing fishing incident?”
We also added another twist-kind’ve a “wild card” known as “Sock-Fight!” on my family’s side and “Breaker-Breaker!” on Bicep’s side. These “wild card’s” cause a head to head challenge with the other team. If you beat them at a skill; drawing, sculpting or charades, you get to go again. If you don’t beat them, you loose your turn.
We spent a long time collaborating on the questions, re-wording, re-writing, making a template on my computer and then printing them off onto the card stock. (Someone is a perfectionist-but I won’t name any names). I then skipped over to a copy center and used their cutting machines to make each card precisely the same size- 2 1/4 x 2 1/4.

And that, my dears, was our DIY Family Board Game. The family loves it because it’s about them. I love it because it’s become a family heirloom that is added to each year with a marriage, a birth, or just another embarrassing moment.
As far as homemade gifts, this one was a dead-ringer.


This looks like it would be such a blast to play. I’m having a family game night this weekend. I wounder if I could finish it before then?
Jamie
http://diyhshp.blogspot.com/
P.S. I have a giveaway going on. Come over and check it out.
I love this! What an awesome idea! I’m definitely stealing it for next year.
Love it!! This is perfect for my game-loving family. The wild cards and personalized game pieces are such a nice touch!!
And-you can add new cards each year with additional family members, stories, etc. It’s kind’ve like a living game. I can’t wait for my kids someday to play it!
Rebekah!!! This is probably the coolest DIY/homemade gift idea I’ve ever seen! Thank you so much for sharing this with us at Frugal Days, Sustainable Ways! I am totally pinning this and posting to my fb wall! LOVE it:)
Thanks so much Andrea! I am so glad that you like it. I had a blast making it and the family loves to play. I think it was a real win-win!
Fun idea! I am featuring this at somedaycrafts.blogspot.com. Grab my “featured” button.
Thanks so much! I am so honored to be featured by you!!! What a way to rock out the weekend!
Woohoo! I’m heading over!
I love this idea so much!!!! I think it may be the BEST handmade Christmas gift EVER!!!! Hoping to carve out time to make this happen this week! Thanks so much for sharing!
Thanks so much Kristy! I am so glad that you liked it. It was quite a hit around here, I know!
What a great idea! I love it. Glad you linked up with the 25 Days of Christmas. I’m a new follower. Stop by and visit and follow too if you like. Warm wishes
[…] my family transitioned into our home days later. We visited a winery, ate more desserts, played the DIY Family Board Game that Bicep’s and I created, and drank lots of […]
[…] looking for an inexpensive, personalized gift to give family this holiday season, try crafting this Family Memories Game. Take an old board game, cover it with white cardstock, draw your path on top, and decorate it with […]
[…] family memory board game like the one described by Potholes and Pantyhose is a treasured keepsake game that the entire […]
[…] family memory board game like the one described by Potholes and Pantyhose is a treasured keepsake game that the entire […]